Introduction & Use Case:
In this blog post, we will explore how to leverage Azure Logic Apps to solve for a common, budget-constrained, mission-critical security use case while also reducing overhead for your SOC analysts. You’ve been charged automating the following scenario:
When a user commits three or more failed login attempts within two minutes, we need to:
-
🚫 Revoke all EntraID sign-ins
-
🔐 Bonus points for options to disable the account and/or force a password reset
-
📨 Notify the user’s manager via email
-
📝 Append a comment to the incident in Sentinel
-
⚡ To add to the challenge, your corporate overlords have decided that upgrading your Microsoft Enterprise E3 licenses to E5 is not an option this fiscal year, meaning you miss out on Risk-Based Conditional Access Policies.

What do you do?
At this point, with the above requirements and contstraints in place, you may feel like a cat with a red ninja headband riding a t-rex while running an efficient security operations center amidst the chaotic influx of alerts (actual prompt for the above image).
As a seasoned Sentinel Ninja Cat, however, you know this can be automated by creating an Analytics Rule in Sentinel and linking it to an Azure Logic App using an Azure Automation Runbook.
You can also configure your Azure Logic App to look for the ‘Manager:’ property in EntraID, automate emailing a notification to the manager, and append a comment to the incident. This automation reduces alert fatigue and overhead on your SOC while meeting corporate goals, even with the given licensing constraints… now that’s Ninja! 🥷

In this Post We Will:
- 🔌 Connect a Sentinel Workspace to EntraID
- 🔎 Build a custom Analytics Rule for Detections
- 🔩 Build Logic Apps to:
- ✓ Revoke EntraID Sessions
- ✓ Reset EntraID Password
- ✓ Disable EntraID Account
- 🔨 Configure a System-Assigned Managed Identity for our Logic Apps
- 🔧 Fine Tune our Logic Apps
- ⚡ Run Logic Apps from Incident Queue to Pass User Data over the Sentinel Connector
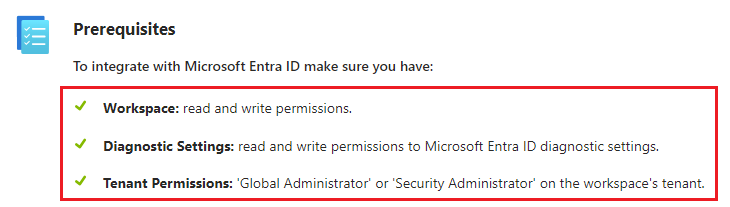
Pre-Requisites
Before going further, ensure the account you’re using has the permissions shown here:
Connect a Sentinel Workspace to EntraID
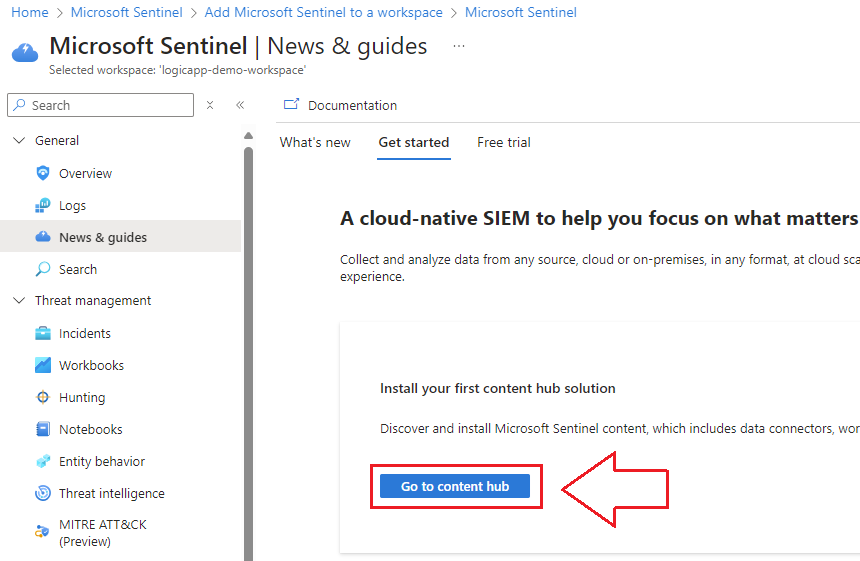
1.) Navigate to your Sentinel Deployment and go to the Content Hub
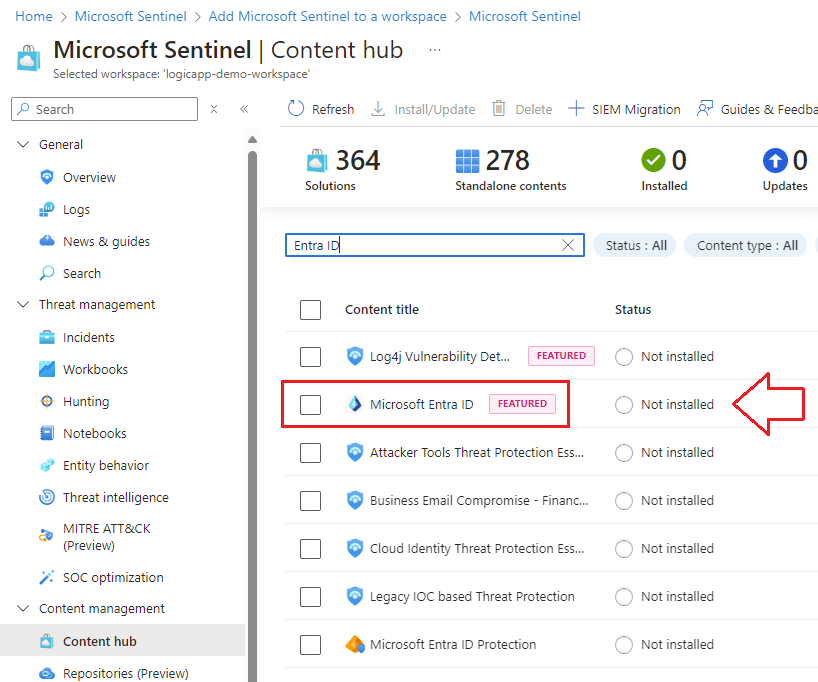
2.) Search for, and select the Microsoft Entra ID solution:
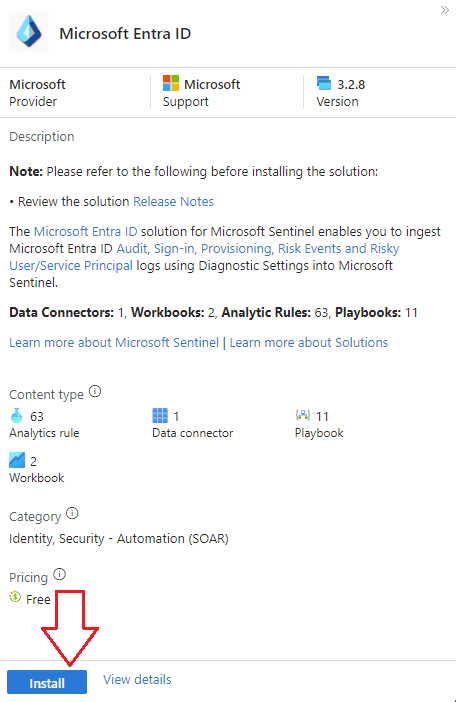
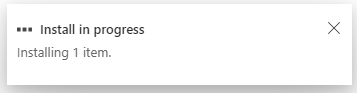
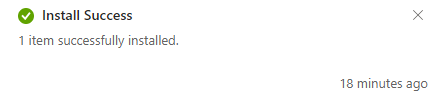
3.) Select Install and wait for it to complete, illustrated below:
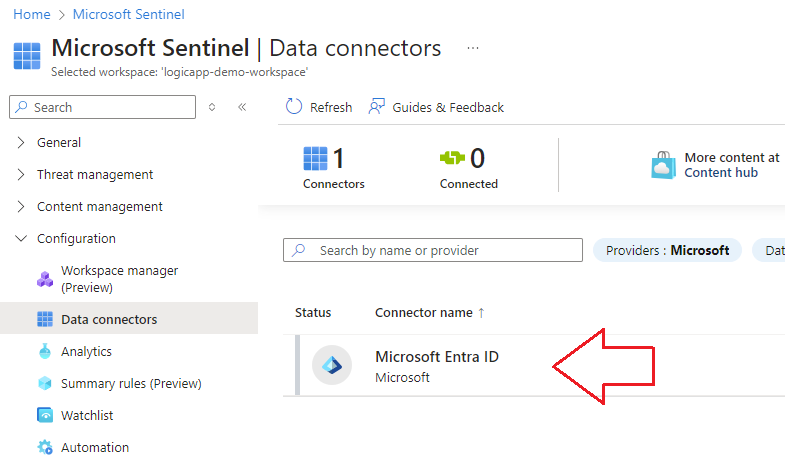
4.) Navigate to the Data Connectors blade and you will now see the Microsoft Entra ID Data Connector available to connect:
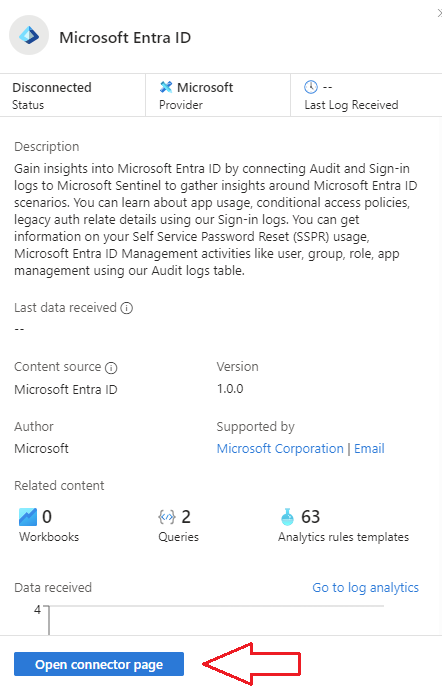
5.) Click on the Entra ID Connector and then on Open connector page.
6.) If your account satisfies the permissions requirements listed earlier, then select the data tables you want to ingest into your Sentinel workspace from your Entra ID tenant.
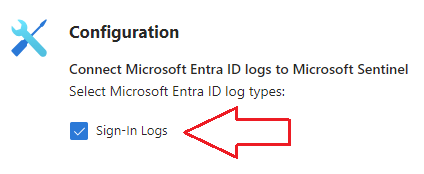
💡 Sign-in logs are all we need for the purposes of this demonstration, but you can pull a lot more data into your workspace if you want to.
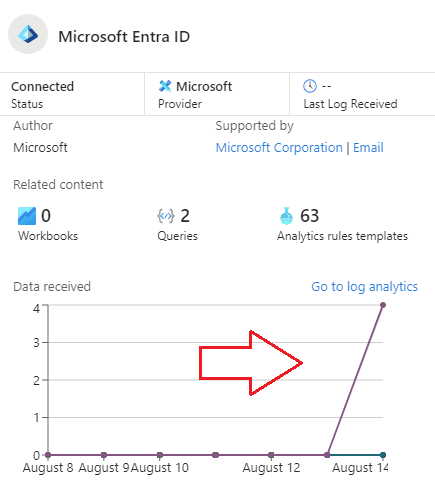
7.) Brew some coffee… this can take a few minutes before it’ll show up as connected in the portal. You’ll see the logs coming in once it’s connected:
Build a custom Analytics Rule for Detections
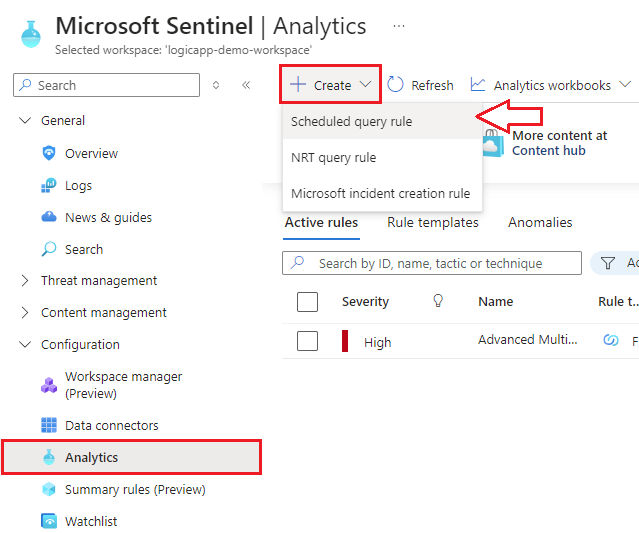
1.) Navigate to your Sentinel Deployment and go to the Analytics Rules blade and select +Create:
2.) Give the rule a name, description, and set it to enabled as shown below:

3.) Enter the KQL logic to determine what activity should trigger the rule:
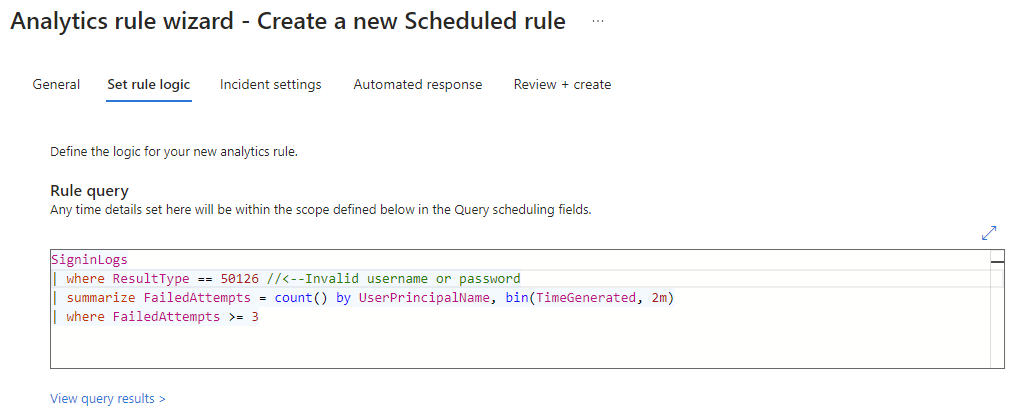
💡 The KQL query is availble to copy and paste here from my KQL repo on github.
💡 EventID 50126 triggers on Invalid username or password or Invalid on-premises username or password, and so satisfies our use-case for this article.
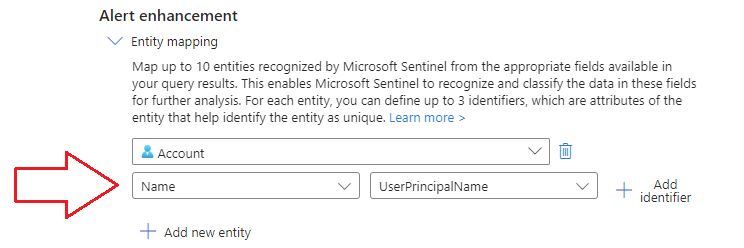
4.) Next we need to map entities. This is important in order to pass on the user’s UPN suffix from an incident generated by this rule, over to our logic app:
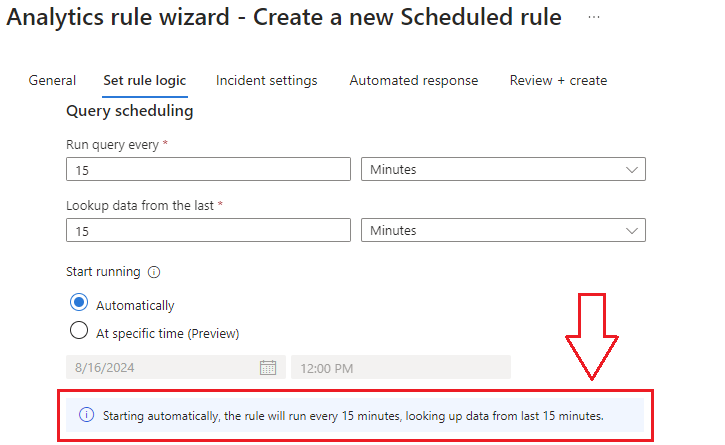
5.) Now we schedule the rule. For the purposes of this demonstration, I’ve set it to trigger every 15 minutes and to run against the last 15 minutes of logs, illustrated below:
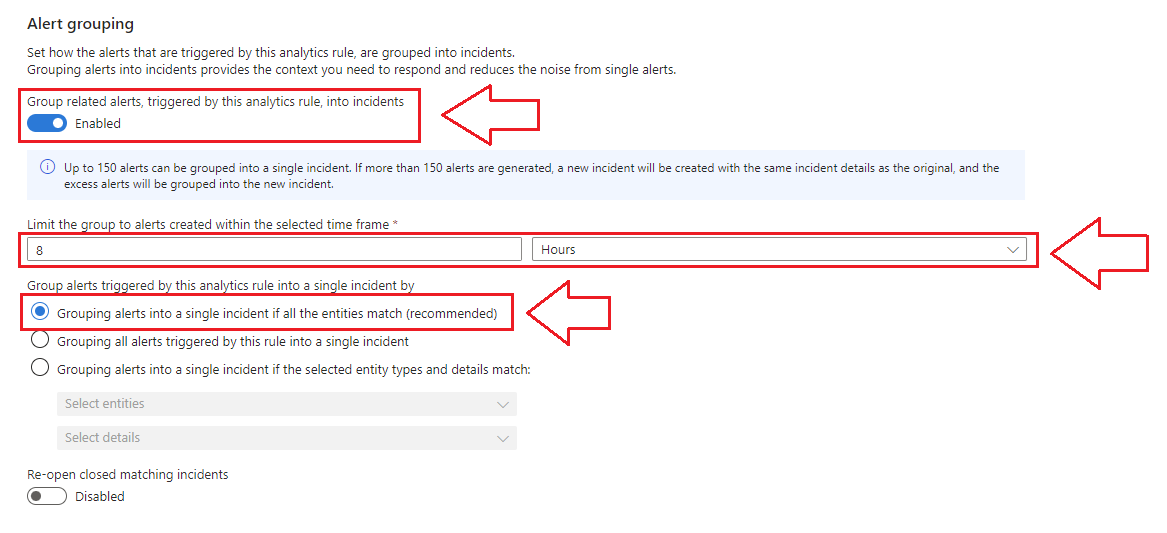
6.) Don’t forget to configure Grouping.
-
To satisfy our use-case, we need to reduce overhead for our SOC as a part of our solution. Grouping similar multiple alerts together into a single incident helps to reduce alert fatigue.
-
In our example, our analytics rule will create an incident when a user fails to login 3 or more times in under 2 minutes… What if Joe fails to login 12 times in under 2 minutes? Rather than flooding your SOC with a separate alert for each trigger, all the failed login alerts can be grouped together by user etc.
-
This is crucial for maintaining your SOC’s sanity and thus their effectiveness under pressure (when you need it most). In the below screenshot, I have enabled grouping alerts by user, by working day (8 hours):
We’ll trigger this analytics rule to generate alerts/incidents later. Next we need to deploy our Logic Apps.
Deploy Your Logic Apps
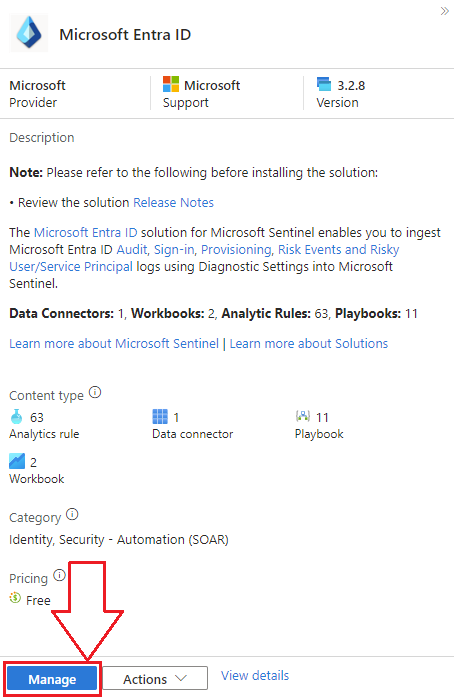
1.) Navigate to the Content Hub and locate your installed Entra ID Solution, then select Manage:
2.) At the time of this article, the Logic Apps that we’re interested in can be found on the 3rd page of the Entra ID Solution in Content Hub.
There are 3 apps in this solution that we’re particularly interested in for our use-case:
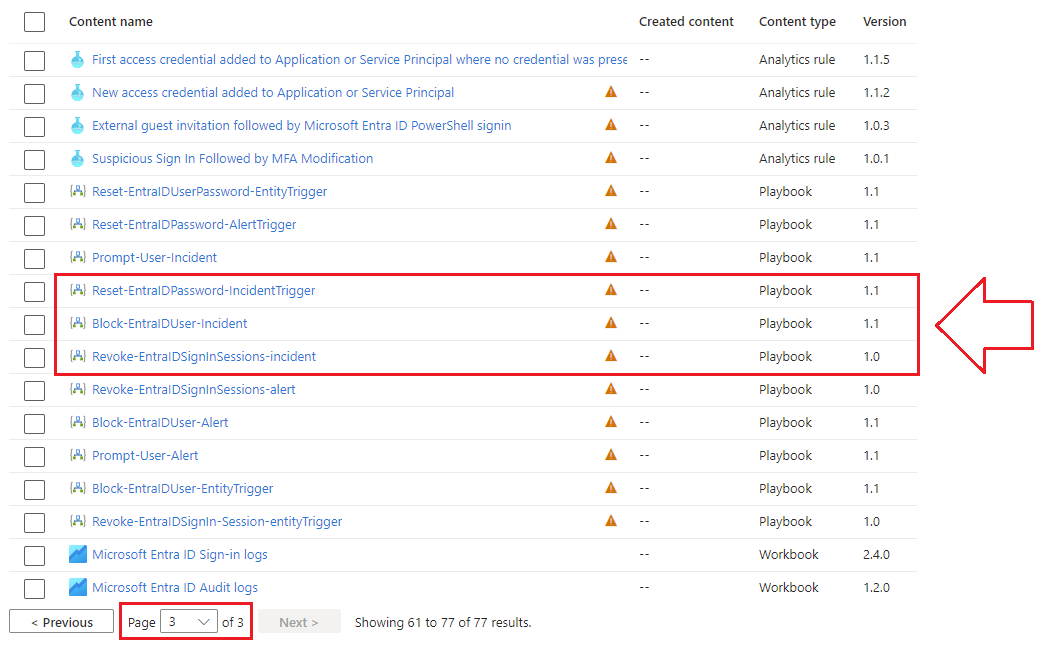
-
⚡ Reset Microsoft Entra ID User Password - Incident Trigger will force reset the offending user’s Entra ID password
-
⚡ Block Entra ID user - Incident will disable the Entra ID account (can be configured to accommodate on-prem AD too)
-
⚡ Revoke Entra ID SignIn Sessions - incident trigger will sign the user out of all Entra ID sessions, forcing them to re-authenticate
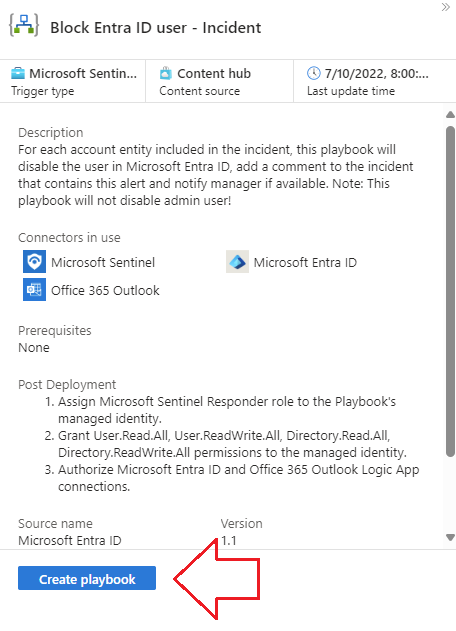
3.) For this example, let’s disable the offending user’s account, notify their manager, and update the incident in Sentinel ✨automagically✨ for our SOC analysts. Select Block Entra ID user - Incident from the list, then click on Create Playbook.
4.) Fill out the appropriate subscription and resource group for your Logic App, then give it a name. You do not need to configure any Connections at this time, just leave them at their default values and click Next through to the end:
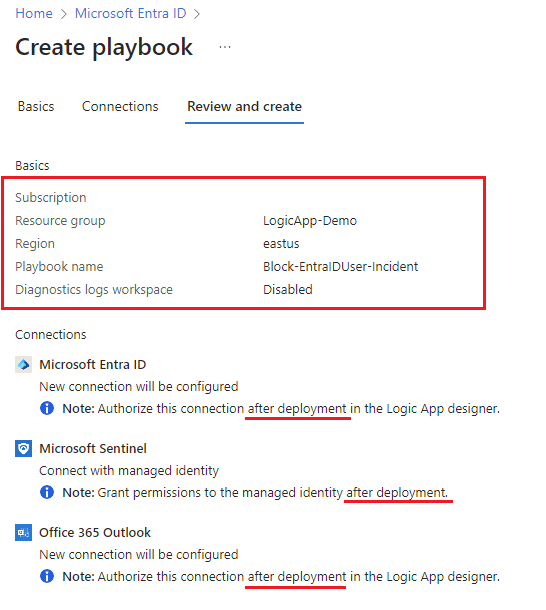
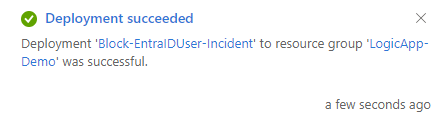
5.) You have now deployed an Azure Logic App. Repeat these steps for the remaining 2 Logic Apps.
💡 You can ignore the ‘invalid connections’ in the above screenshot, we’ll fix those next with a System-Assigned Managed Identity and email account to send from etc.
Grant Logic App Permissions to Interact with Sentinel
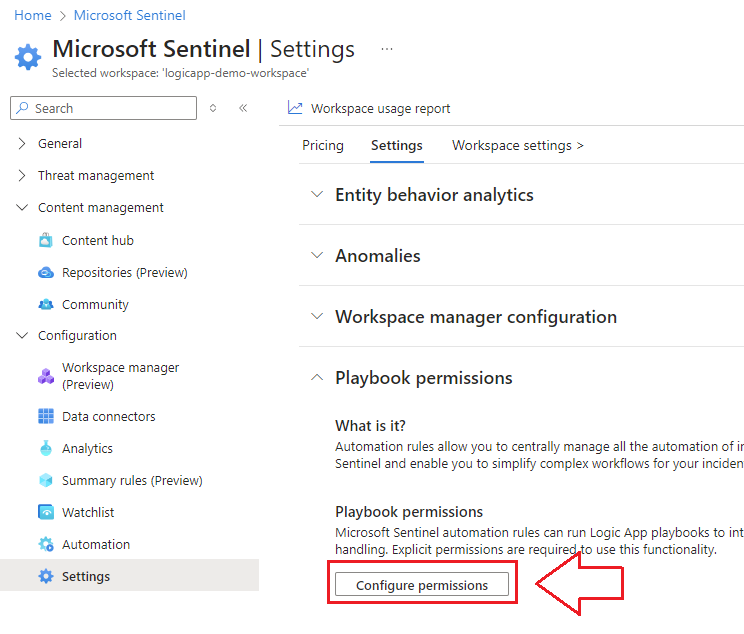
1.) First thing we need to do is grant the Logic App permissions to interact with the Sentinel Workspace by navigating to the Settings blade in Sentinel and expanding the Playbook Permissions dropdown. Click on Configure Permissions:
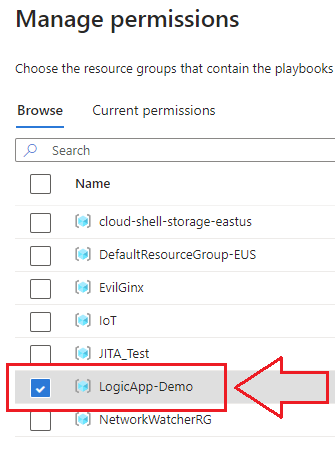
Next, select the Resource Group where your Logic Apps or Playbooks live to adhere to the Principle of Least Privilege:
Configure a System-Assigned Managed Identity (Permissions Madness!)
Adhering to the Zero Trust Network Architecture and Principle of Least Privilege mode of thinking, each of our logic apps will need very specific privileges in order to automate the tasks we want them to:
-
Revoke Entra ID SignIn Sessions - incident trigger requires “User.Read.All”, and “User.RevokeSessions.All” in order to reoke Entra ID sessions.
-
Reset Microsoft Entra ID User Password - Incident Trigger requires “User.Read.All”, and the “Password Administrator role as well.
-
Block Entra ID user - Incident requires “User.Read.All”, “Directory.Read.All”, and “User.EnableDisableAccount.All” in order to Disable a user account.
🔑 Note: all of the above Logic Apps will also require special permissions in order to look up the offending user’s manager in Entra ID and then update the incident in Sentinel.
Let’s start with the Block Entra ID user - Incident because we can easily confirm the results in Entra ID once the user gets locked out.
1.) Before we can assign the necessary permissions, we need to know what we’re assigning them to. Navigate to the Logic App and open the Identities blade to see the Object’s Principle ID. Take note, we’ll need this ID for the next step.
👇 Here’s a script that will grant the necessary privileges to disable an EntraID account for a Managed Identity 👇
$MIGuid = "xxxxxxxx-xxxx-xxxx-xxxx-xxxxxxxxxxxx" #<-- Insert your Managed ID
$MI = Get-AzureADServicePrincipal -ObjectId $MIGuid

$GraphAppId = "00000003-0000-0000-c000-000000000000" #<--Do not change this
$PermissionName1 = "User.Read.All"
$PermissionName2 = "Directory.Read.All"
$PermissionName3 = "User.EnableDisableAccount.All"

$GraphServicePrincipal = Get-AzureADServicePrincipal -Filter "appId eq '$GraphAppId'"
$AppRole1 = $GraphServicePrincipal.AppRoles | Where-Object {$_.Value -eq $PermissionName1 -and $_.AllowedMemberTypes -contains "Application"}
New-AzureAdServiceAppRoleAssignment -ObjectId $MI.ObjectId -PrincipalId $MI.ObjectId `
-ResourceId $GraphServicePrincipal.ObjectId -Id $AppRole1.Id

$AppRole2 = $GraphServicePrincipal.AppRoles | Where-Object {$_.Value -eq $PermissionName2 -and $_.AllowedMemberTypes -contains "Application"}
New-AzureAdServiceAppRoleAssignment -ObjectId $MI.ObjectId -PrincipalId $MI.ObjectId `
-ResourceId $GraphServicePrincipal.ObjectId -Id $AppRole2.Id

$AppRole3 = $GraphServicePrincipal.AppRoles | Where-Object {$_.Value -eq $PermissionName3 -and $_.AllowedMemberTypes -contains "Application"}
New-AzureAdServiceAppRoleAssignment -ObjectId $MI.ObjectId -PrincipalId $MI.ObjectId `
-ResourceId $GraphServicePrincipal.ObjectId -Id $AppRole3.Id
💡 There are unique permissions required for each of the remaining 2 logic apps mentioned earlier, and the PowerShell scripts for each are available here.
2.) Download the script here from my Github Repo and swap in your Managed Identity’s Principle Object ID in the first line.
Launch PowerShell as an administrator and run the script.
💡 You may need to run the following powershell commands first to connect to your tenant:
Connect-AzureAD
You’ll see the following output if completed run successfully:

💡 This can take a while to propogate on the back end, even after the script ran successfully. Give it at least 20-30 minutes…
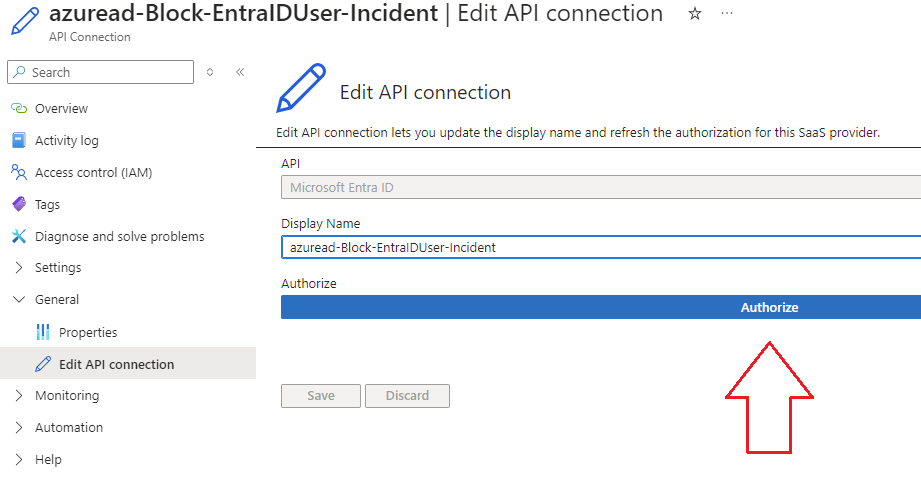
3.) Next we need to Authorize the API connections used to connect to a mailbox to send a notification email to the manager etc. Navigate to your Logic App and go to the API Connections blade underneath Development Tools.

4.) Expand the General dropdown on the left and go to the Edit API connection blade, then click on Authorize and save:
5.) Go back and repeat this step for all of the API connections listed.
💡 If you run into an error authorizing the o365 API connection for sending email, make sure you’re connecting to an account that has a mailbox to send from (must have an exchange license).
💡 If you go back to the Logic App Designer you will no longer have the red “invalid connector” errors if the above steps have been done correctly.
Run the App!
First we need to generate at least 3 failed login attempts in under 2 minutes for our Analyitics Rule to generate an incident.
- 👉 Go to an incognito/private browsing session and try to login to the Azure portal with a bogus password a few times. The Analytics rule is set to run every 15 minutes so it should show up soon. You’ll see it in the Incidents blade in Sentinel.
Now that we’ve got an incident to run our Logic App/Playbook against, lets do it!
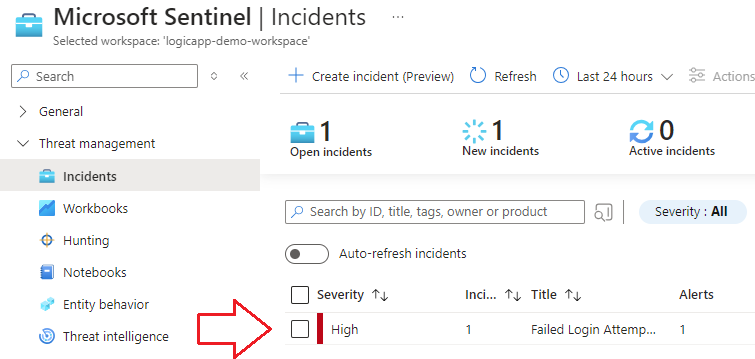
1.) Navigate to the Incidents blade in Sentinel and identify our incident:
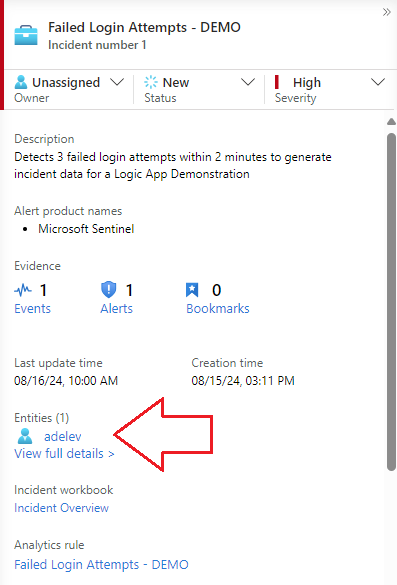
💡 In the incident details, you can see the offending user who triggered the incident. This information will be passed to the logic app:
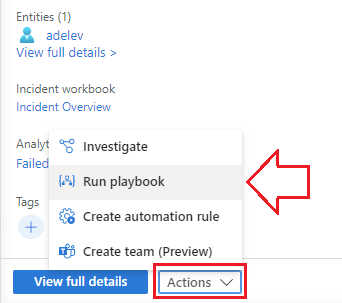
2.) Click on the Incident to bring up the incident fly-out and select Actions, then Run Playbook:
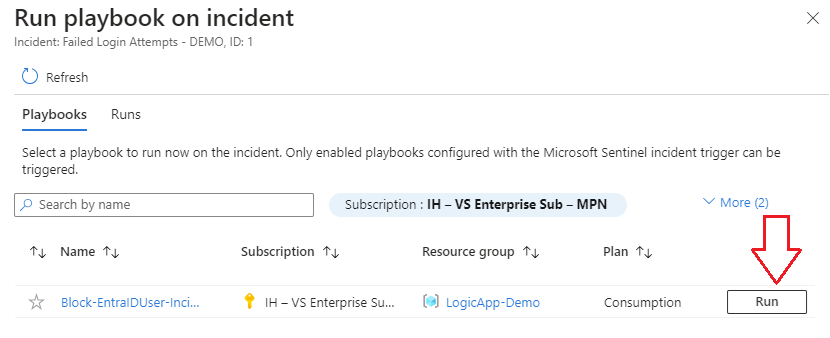
3.) Select your Logic App/Playbook and run it against the incident, which sends the user data over for the app to process:
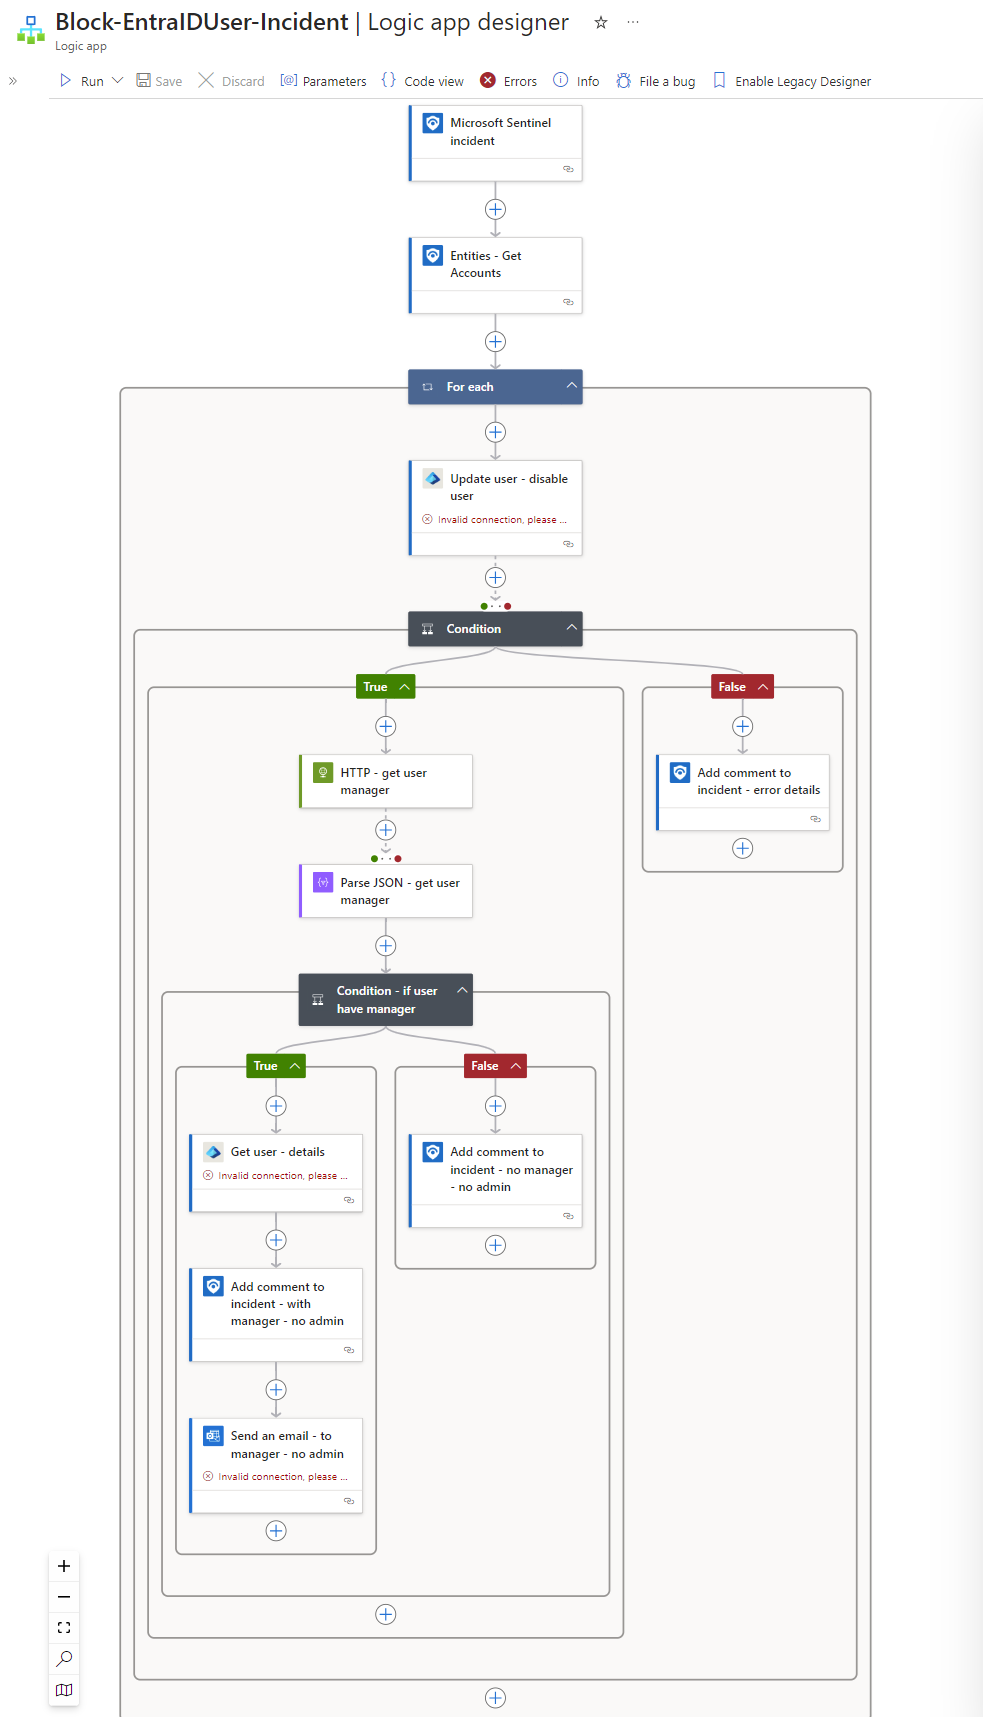
Logic App Breakdown:
Let’s take a look at what’s going on under the hood at each step of the Logic App so we can tweak or fine tune it to our needs. When we ran the Block Entra ID user - Incident, here’s what happens…
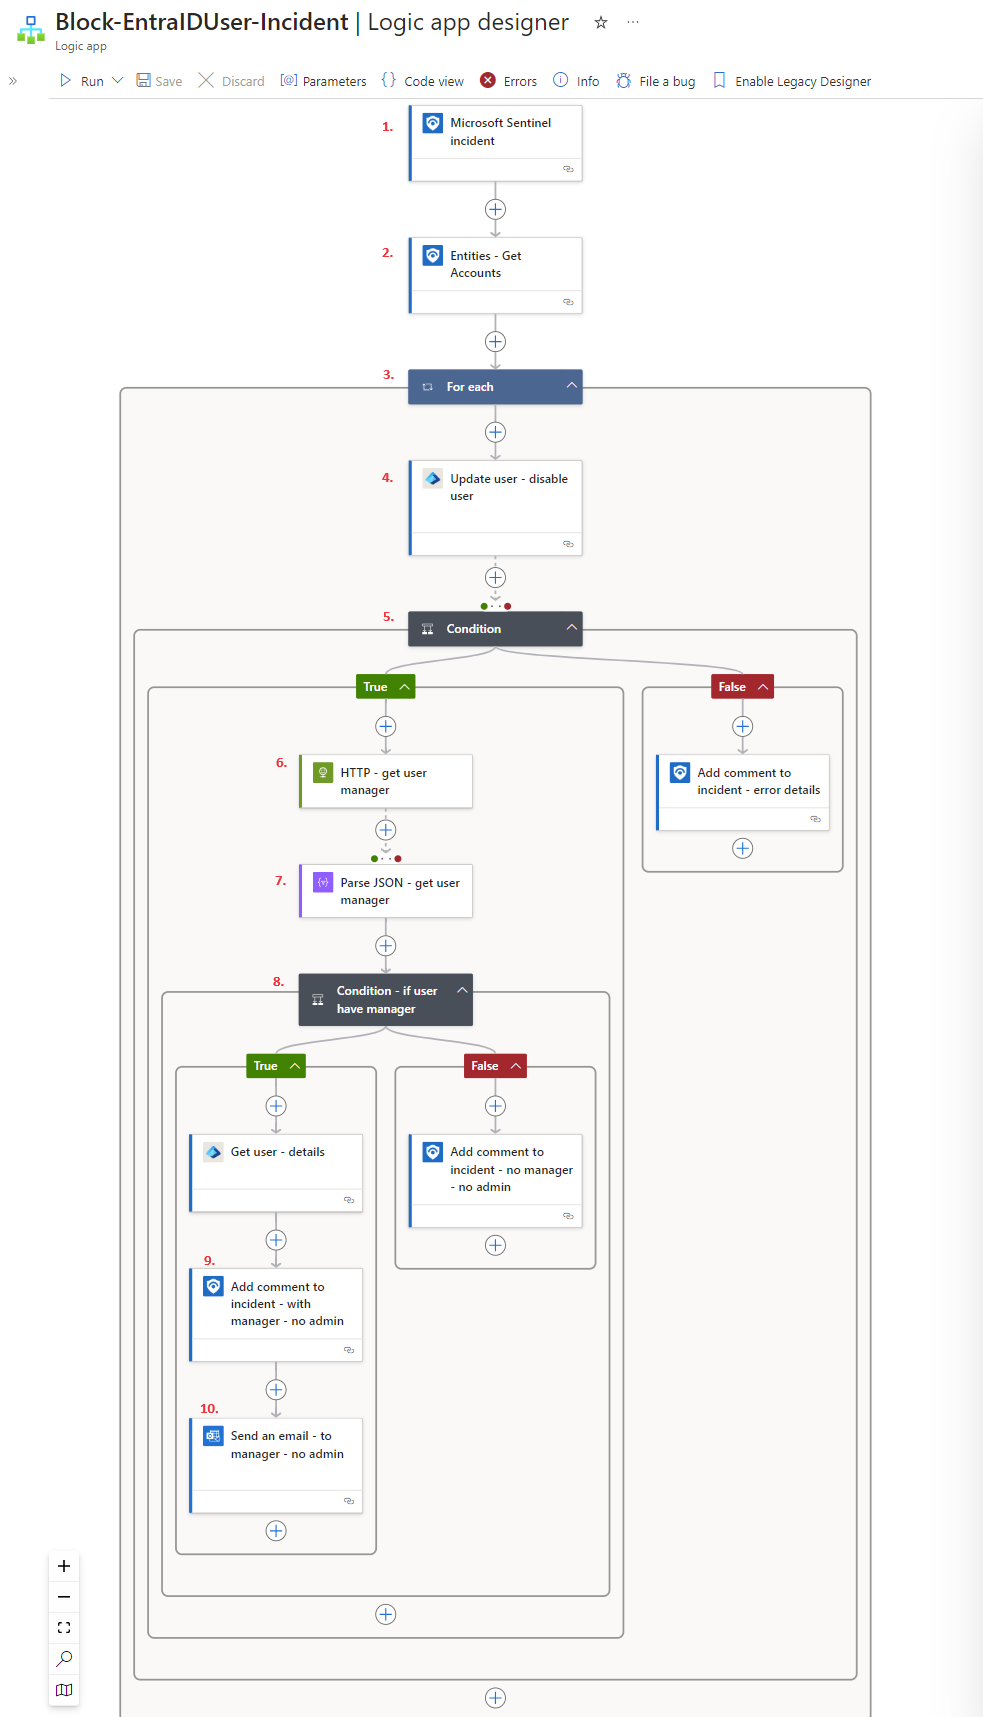
1.) Microsoft Sentinel Incident Trigger triggers the app upon receipt of new incident data.
2.) Entities - Get Accounts grabs the User Name and UPN Suffix from the incident data.
3.) For Each is a loop that runs until it has iterated through all the User accounts from the previous step.
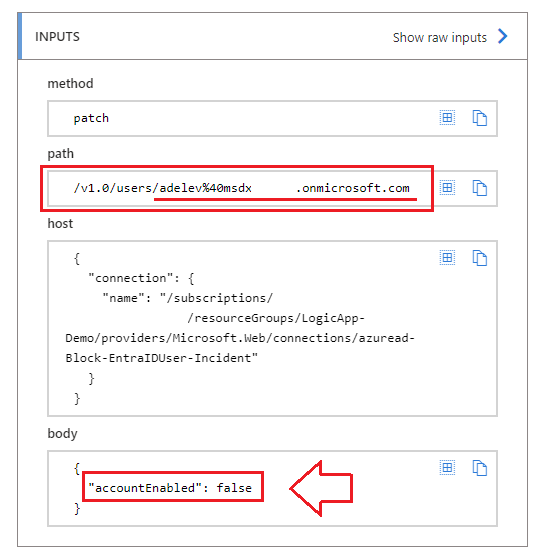
4.) Update User - Disable User combines the User Name and UPN Suffix from the previous step like this:
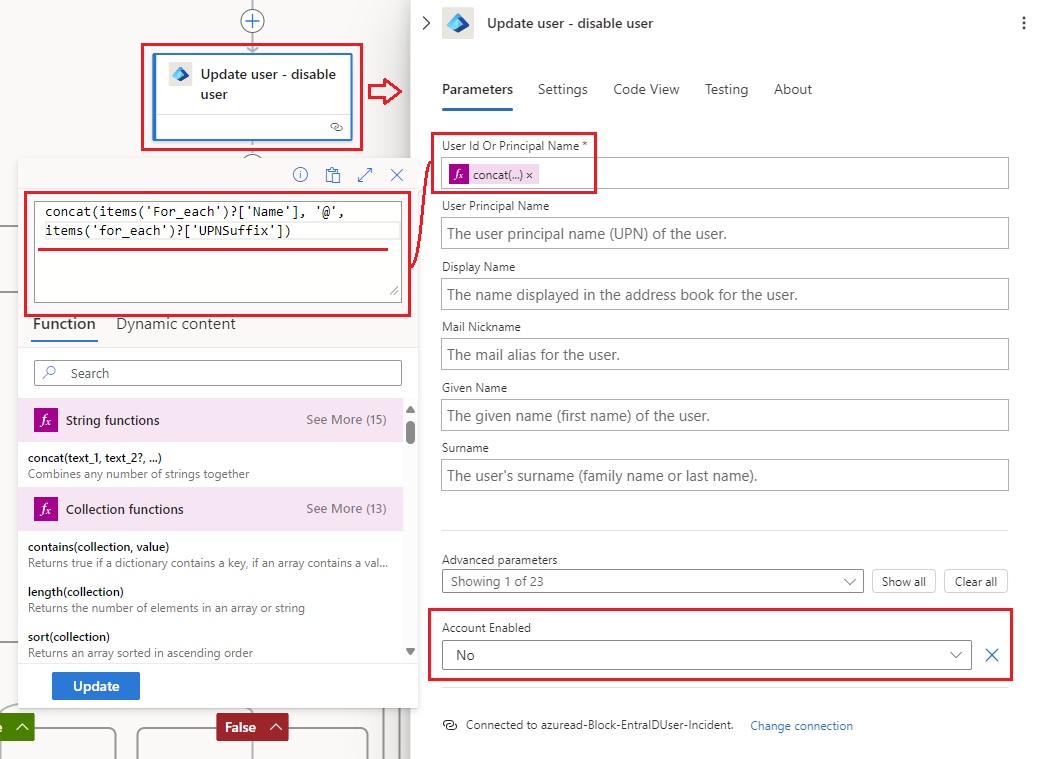
…To create a Microsoft Graph URI that disables the account like this:
5.) Condition Did the previous step succeed (Yes/No)?
- If No then update the incident with a comment stating that the account could not be disabled automatically.
- If Yes then move on to next step in decision tree.
6.) HTTP - Get User Manager looks up the offender user’s manager in EntraID and feeds it to the next step.
7.) Parse JSON - Get User Manager Read/Parse the Manager’s information according to specified schema/structure (String Object).
8.) Condition - Does user have manager? Was the Manager property filled out for this user (is it null?).
- No Append a comment to the incident stating that the user was disabled in AAD via playbook Block-AADUser, but that their manager has not been notified, since it is not found for this user.
- Yes Grab offending user name and information to pass on to next step.
9.) Add comment to incident - with manager appends a comment to the incident in Sentinel stating that the user was disabled and that the manager has been notified.
10.) Send an email - to manager sends an email to the manager from the mailbox associated with the connector:

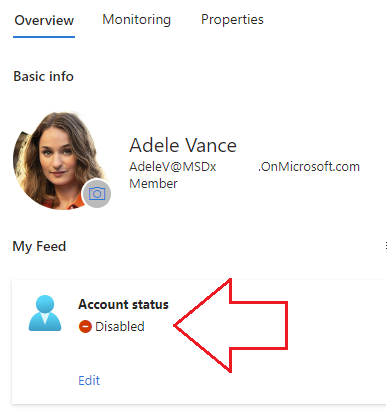
To confirm, we can navigate to Entra ID and look up the offending user’s account status:
💡 There are unique permissions required for each of the remaining 2 applications mentioned earlier, and the PowerShell scripts to automate those are available here.
Ian’s Insights:
Today we satisfied our business security use case of automating responses to risky sign-in behaviour and got bonus points for providing 3 separate automated logic apps each with different outcomes. Each of these logic apps will automate either restting a password, disabling an account, or revoking sign-in sessions. To reduce overhead on our SOC, the apps also automate an email to the user’s manager, and update the incident so the analyst working the incident doesn’t have to. It may feel like we’re reinventing the wheel if you’ve got E5 licenses, but that’s not always in the cards and those companies need protection too right? This is a practical solution for E3 or P2 customers until they can make the leap to E5.
In this Post:
We dove into how the following tools can enhance your security posture, providing practical examples and best practices:
- 🔌 Connect a Sentinel Workspace to EntraID
- 🔎 Custom Analytics Rules for Detections
- 🔩 Logic Apps:
- ✓ Revoke EntraID Sessions
- ✓ Reset EntraID Password
- ✓ Disable EntraID Account
- 🔨 Configure System-Assigned Managed Identities for our Logic Apps
- 🔧 Fine Tune our Logic Apps
- ⚡ Run Logic Apps from Incident Queue to Pass User Data over the Sentinel Connector

Thanks for Reading!
Whether you’re dealing with unusual sign-in patterns, potential insider threats, or other security challenges, I hope these insights help you safeguard your organization with confidence until E5 is on the Corporate Roadmap.
Helpful Links & Resources:
- Origin of #NinjaCat
- Microsoft Feature Comparison Matrix
- Azure Logic Apps
- EntraID Identity Protection - Risk-Based Conditional Access Policies
- Analytics Rules
- What is EntraID?
- https://leonardo.ai/
- Powershell Scripts for Managed ID Permissions
- KQL Query used in Analytics Rule
- KQL Library

