Introduction & Use Case:
⏱ In the fast-paced world of cybersecurity, the ability to swiftly respond to threats is crucial. However, even the most well-oiled Security Operations Center (SOC) can encounter hiccups, such as Role-Based Access Control (RBAC) configuration mishaps that can, for example, hinder the manual registration of Indicators of Compromise (IOCs) in the Microsoft Defender portal and much, much more. When such issues arise, having an alternative method to publish IOCs becomes invaluable.
🔐 Moreover, with the upcoming enforcement of Multi-Factor Authentication (MFA) later this year, relying on user-based service accounts for automation is becoming increasingly untenable. These accounts will break under the upcoming changes Microsoft is going to enforce, potentially leaving your SOC vulnerable at critical moments.
⚡ You’re no stranger to danger; you know you can register an app in EntraID for authentication and permissions, then use PowerShell to automate the process of submitting IOCs to Microsoft Defender, ensuring that your SOC remains agile and responsive even in the face of access control challenges. This approach not only streamlines your threat response but also reinforces your overall security posture by maintaining continuous protection against emerging threats.
👉 In this blog post, we’ll explore how to set up and use PowerShell to publish IOCs to Microsoft Defender with a registered EntraID application. We’ll walk you through the necessary steps for authentication and permissions, providing a robust solution for when manual methods fall short. Whether you’re dealing with IP addresses, domains, or other threat indicators, this guide will equip you with the knowledge to keep your defenses strong and your response times swift… like a ninja! 🥷

The Method to the Madness:
Registering an application and using the application secret is a good practice for migrating away from user-based service accounts, especially with the upcoming Multi-Factor Authentication (MFA) enforcement from Microsoft. Here are some reasons why this approach is beneficial:
-
💪 Stability and Reliability: Application secrets are not subject to the same MFA requirements as user accounts, ensuring that your automation scripts continue to run smoothly without interruption.
-
🛡️ Security: Using application secrets reduces the risk associated with user credentials, such as password expiration and the potential for credentials to be compromised. Application secrets can be managed and rotated securely, providing a more controlled environment.
-
📈 Scalability: Applications can be granted specific permissions, making it easier to manage access and roles as your environment grows. This approach supports better governance and compliance with security policies.
-
📝 Audit and Monitoring: Activities performed by the application can be tracked and audited separately from user activities, providing clearer visibility into actions taken by automation scripts.
-
🔍 Compliance: Aligning with best practices and upcoming security requirements helps ensure compliance with industry standards and regulations.
By transitioning to application-based authentication, you can enhance the security, reliability, and manageability of your automation processes, making it a forward-thinking strategy in light of the upcoming MFA enforcement.
In this Post We Will:
- 🔌 Register an Application in Entra ID
- 🔒 Manage Application Permissions (Principle of Least Privilege)
- 🔑 Configure Application Authentication & Authorization
- 🔩 Build a powershell script to grab our token
- 🔧 Build a powershell script to submit our custom IoC
- 🔨 Run it!
Pre-Requisites
Global Administrator will cover it, BUT if you want to go Principle of Least Privilege, read on…
To register an application in Entra ID (formerly Azure AD), assign it privileges, and grant admin consent, you need specific permissions and roles. Here’s a breakdown of the steps and required permissions:
🔑 Registering an Application: Permissions Needed: By default, all users can register applications. However, if this ability is restricted, you need to be assigned the Application Developer role or higher.
🔑 Assigning Privileges: Permissions Needed: To assign API permissions to the application, you need to be an Application Administrator, Cloud Application Administrator, or Privileged Role Administrator.
🔑 Granting Admin Consent: Permissions Needed: To grant tenant-wide admin consent, you need to be a Privileged Role Administrator, Application Administrator, or Cloud Application Administrator.
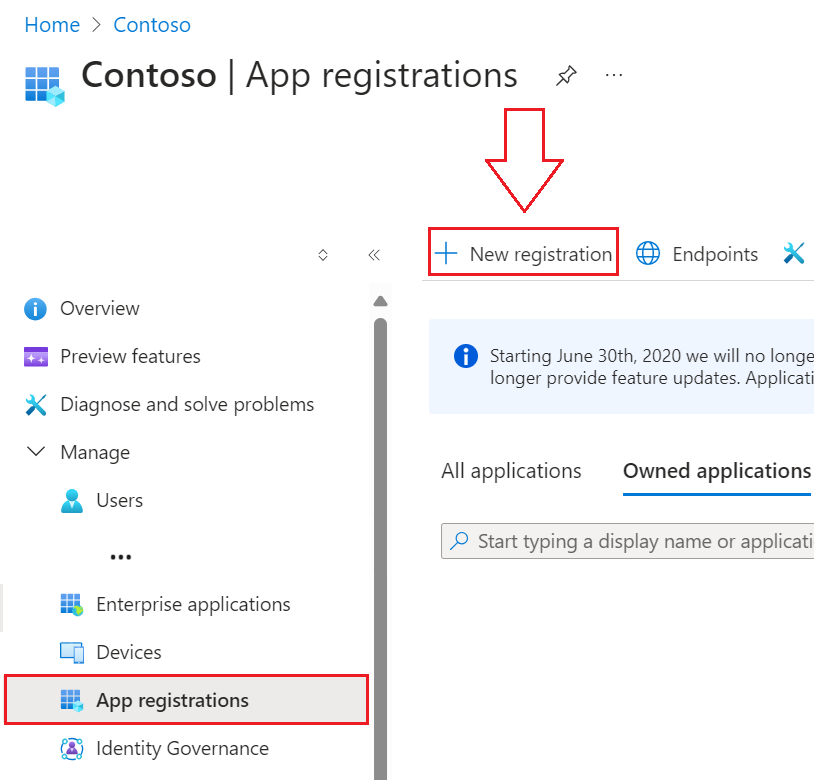
Register an Application in Entra ID
- Navigate to your Entra ID portal, App Registrations, then to New Registration:
- Fill out a Name, and select Accounts in this organizational directory only.
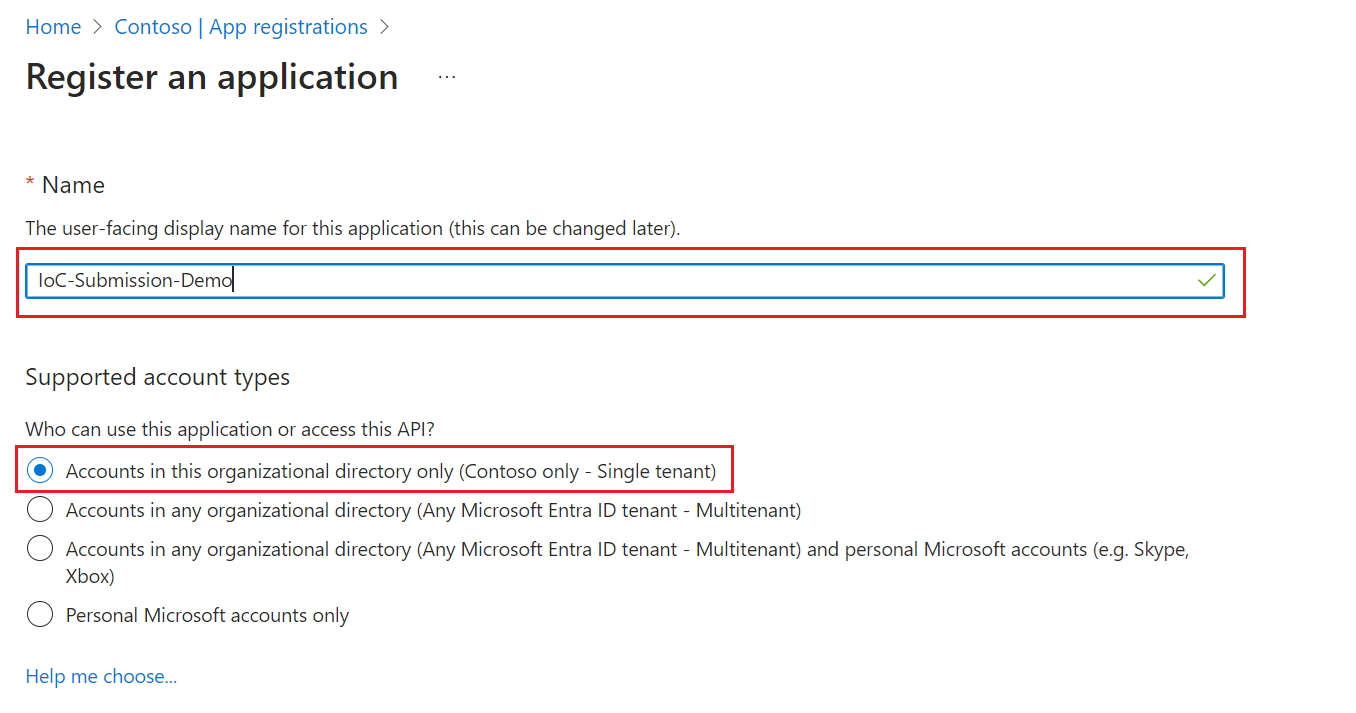
- Leave the optional Redirect URI blank.

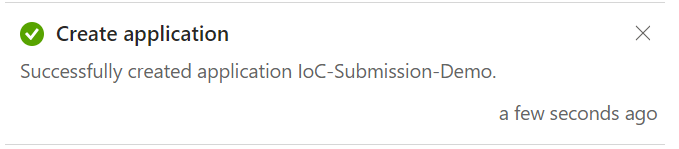
- Select Register to register your new Entra ID Application.
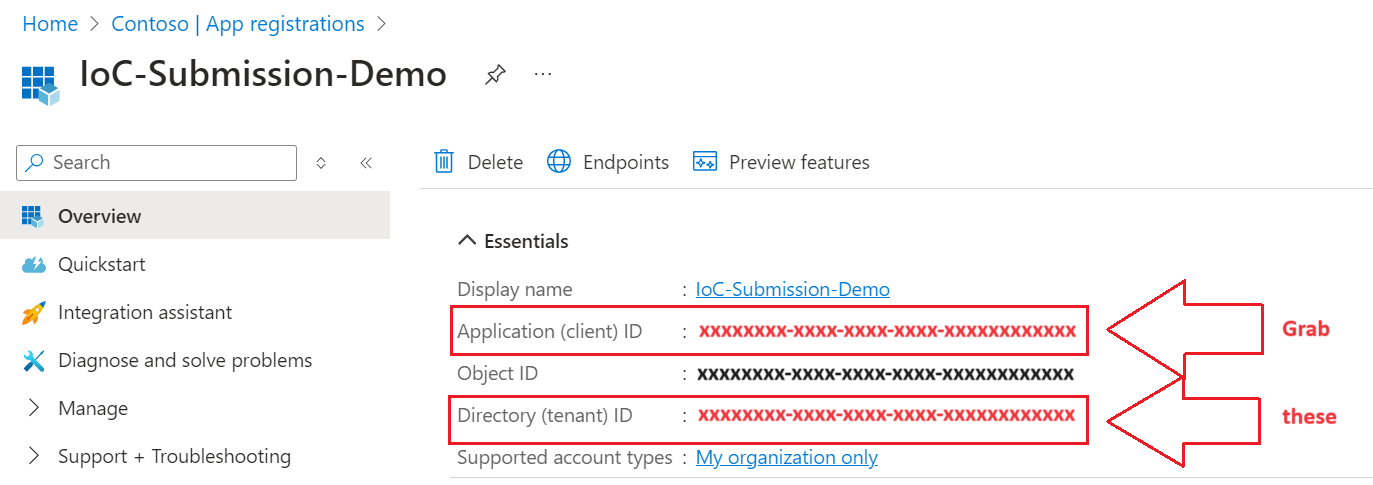
- On the new application’s Overview Page, take note of the Application ID and Tenant ID for later:
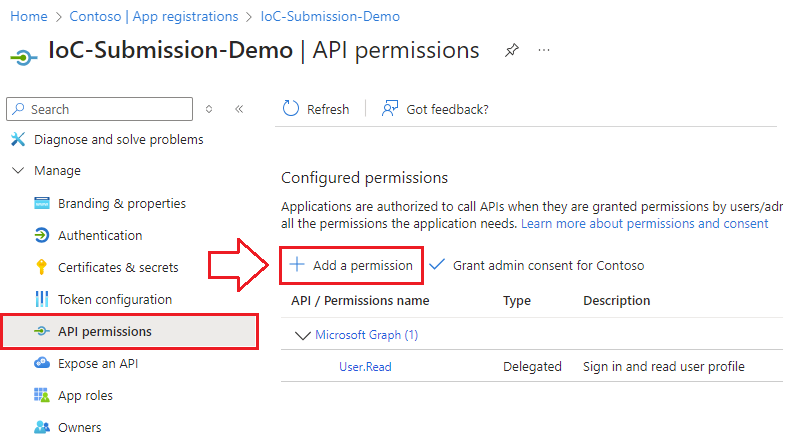
Manage Application Permissions
- Navigate to API Permissions and select Add permission:
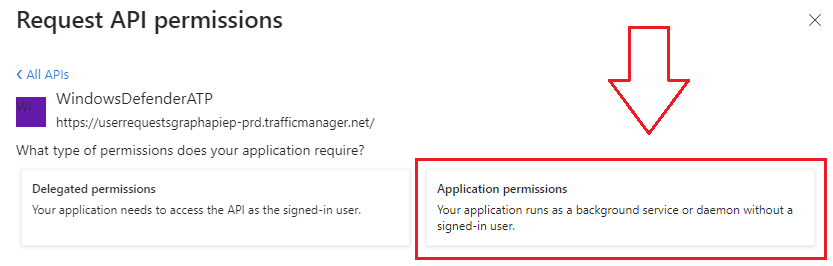
- Select APIs my organization uses and search for WindowsDefenderATP:

- Select Application Permissions, illustrated below:
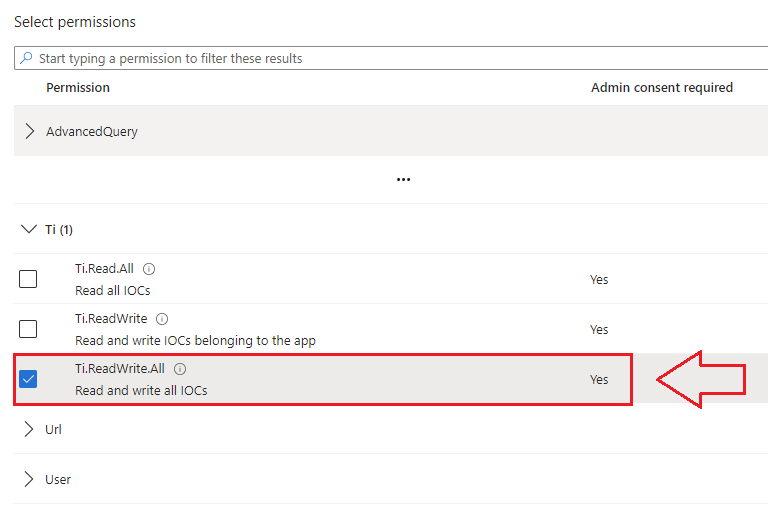
- Expand the Threat Intelligence (Ti) drop down menu and select Ti.ReadWrite.All as this application needs to be able to read and create IoCs.
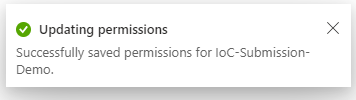
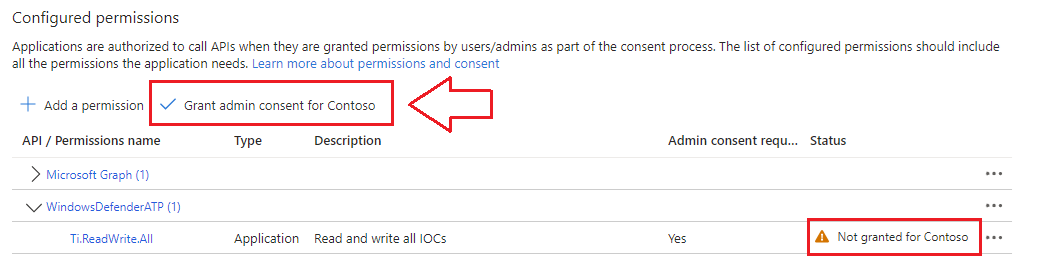
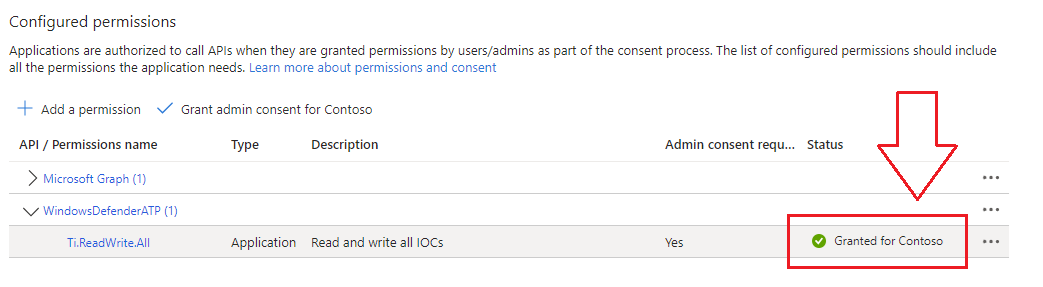
- Provide Admin Consent:
Configure Application Authentication & Authorization
We need to create an application key (secret).
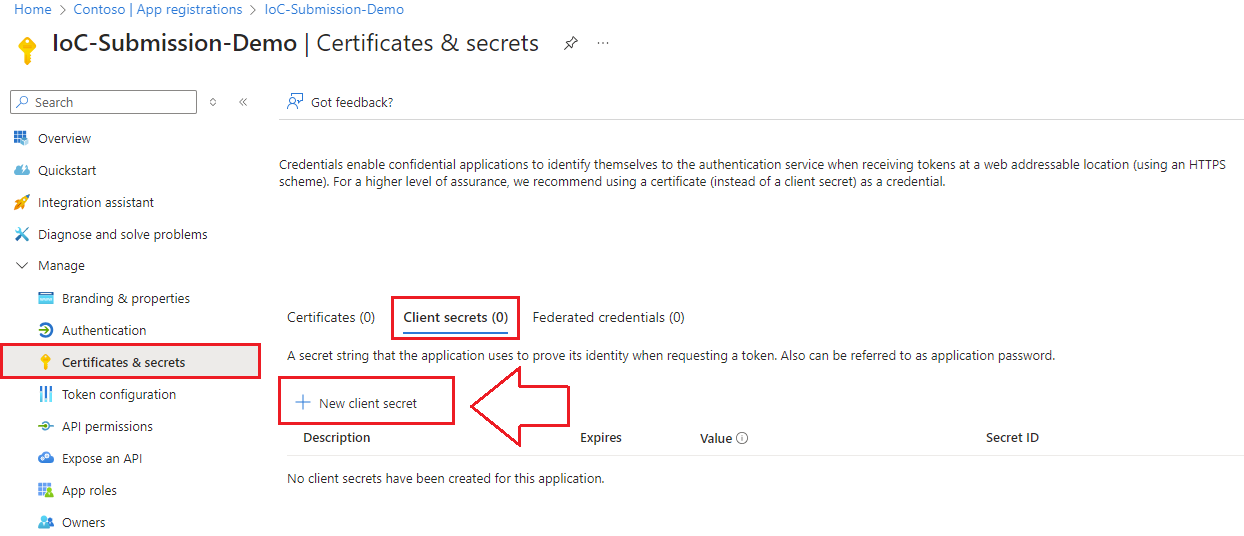
- Navigate to your application in the Azure portal and select Certificates & Secrets, Client Secrets, then + New client secret as shown below:
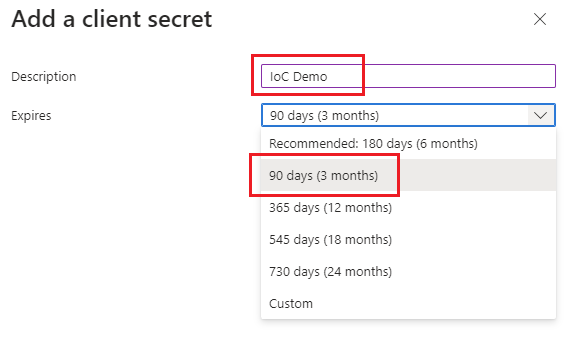
- Give your secret a name and expiration:
- Grab the secret Value:
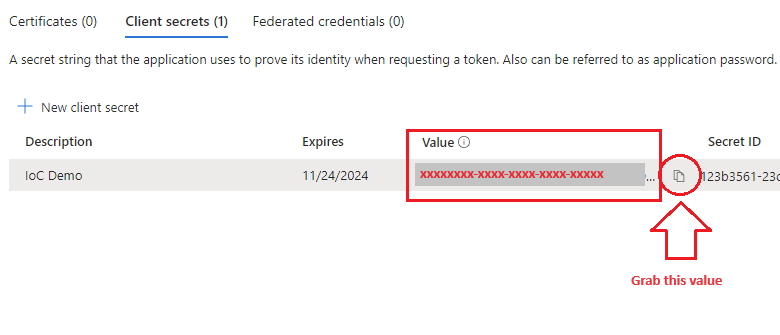
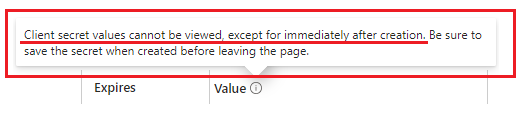
💡 WARNING!!! –> You can ONLY view the secret value once… when you navigate away from the page it will no longer be available
- At this point, you should now have an Application ID, Tenant ID, and Application Secret locked and loaded.
Build a PowerShell Script to Grab our Token
This script gets the App Context Token and saves it to a file named “Latest-token.txt” in the current directory and prompts the user for Tenant ID, App ID, and App Secret and is available here.
# Prompt the user for Tenant ID, App ID, and App Secret
$tenantId = Read-Host -Prompt 'Enter your Tenant ID'
$appId = Read-Host -Prompt 'Enter your Application ID'
$appSecret = Read-Host -Prompt 'Enter your Application Secret'

$resourceAppIdUri = 'https://api.securitycenter.windows.com'
$oAuthUri = "https://login.windows.net/$TenantId/oauth2/token"

$authBody = [Ordered] @{
    resource = "$resourceAppIdUri"
    client_id = "$appId"
    client_secret = "$appSecret"
    grant_type = 'client_credentials'
}

$authResponse = Invoke-RestMethod -Method Post -Uri $oAuthUri -Body $authBody -ErrorAction Stop
$token = $authResponse.access_token
Out-File -FilePath "./Latest-token.txt" -InputObject $token
return $token
Build a PowerShell Script to Submit our Custom IoC
param (
    [Parameter(Mandatory=$true)]
    [ValidateSet('FileSha1','FileSha256','IpAddress','DomainName','Url')]   #validate that the input contains valid value
    [string]$indicatorType,

    [Parameter(Mandatory=$true)]
    [string]$indicatorValue,     #an input parameter for the alert's ID

    [Parameter(Mandatory=$false)]
    [ValidateSet('Alert','AlertAndBlock','Allowed')]   #validate that the input contains valid value
    [string]$action = 'Alert',                         #set default action to 'Alert'

    [Parameter(Mandatory=$true)]
    [string]$title,

    [Parameter(Mandatory=$false)]
    [ValidateSet('Informational','Low','Medium','High')]   #validate that the input contains valid value
    [string]$severity = 'Informational',                   #set default severity to 'informational'

    [Parameter(Mandatory=$true)]
    [string]$description,

    [Parameter(Mandatory=$true)]
    [string]$recommendedActions
)

# Prompt the user for the necessary values
$indicatorType = Read-Host -Prompt 'Enter the Indicator Type (FileSha1, FileSha256, IpAddress, DomainName, Url)'
$indicatorValue = Read-Host -Prompt 'Enter the Indicator Value'
$action = Read-Host -Prompt 'Enter the Action (Alert, AlertAndBlock, Allowed)' -Default 'Alert'
$title = Read-Host -Prompt 'Enter the Title'
$severity = Read-Host -Prompt 'Enter the Severity (Informational, Low, Medium, High)' -Default 'Informational'
$description = Read-Host -Prompt 'Enter the Description'
$recommendedActions = Read-Host -Prompt 'Enter the Recommended Actions'

$token = .\Get-Token.ps1                              # Execute Get-Token.ps1 script to get the authorization token

$url = "https://api.securitycenter.windows.com/api/indicators"

$body =
@{
    indicatorValue = $indicatorValue
    indicatorType = $indicatorType
    action = $action
    title = $title
    severity = $severity
    description = $description
    recommendedActions =  $recommendedActions
}

$headers = @{
    'Content-Type' = 'application/json'
    Accept = 'application/json'
    Authorization = "Bearer $token"
}

$response = Invoke-WebRequest -Method Post -Uri $url -Body ($body | ConvertTo-Json) -Headers $headers -ErrorAction Stop

if($response.StatusCode -eq 200)   # Check the response status code
{
    return $true        # Update ended successfully
}
else
{
    return $false       # Update failed
}
💡 Both scripts are available here on Github. It’s important that you download and save both of these scripts to the same directory, because the Submit-Indicator.ps1 script will try to call the Get-Token.ps1 script when it runs. Both of these scripts originally had the variables hardcoded, you can see the difference and check out the original scripts here
Run it!
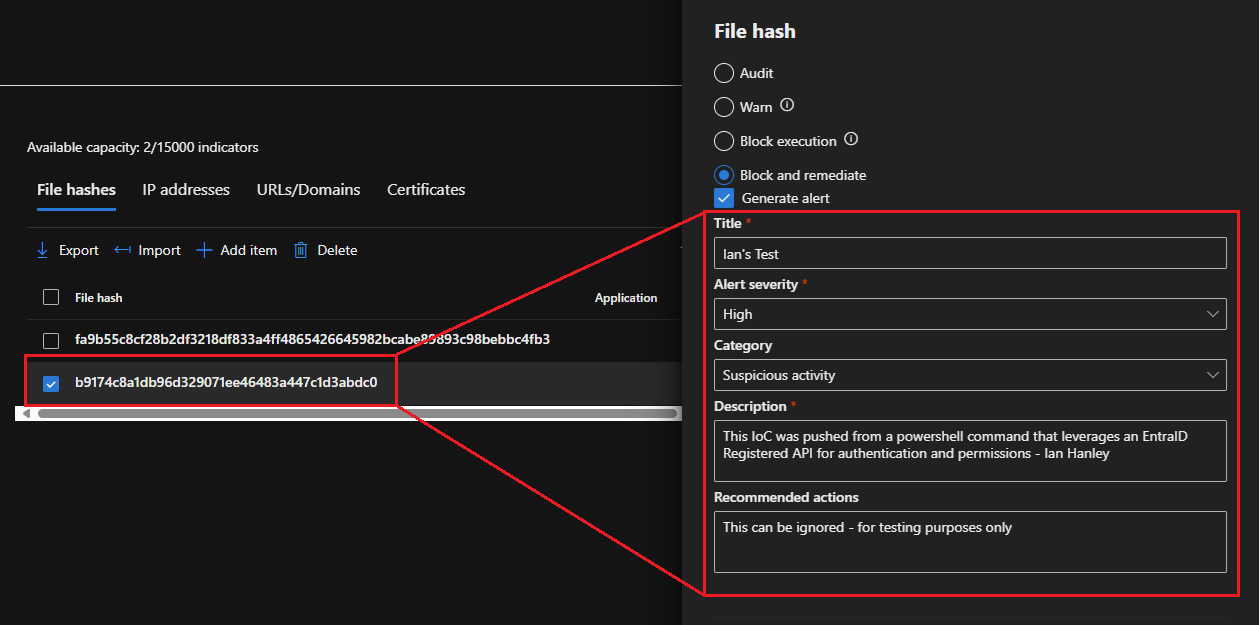
Open up a PowerShell window as an Administrator and run the Submit_Indicator.ps1 PowerShell script and fill out the prompts accordingly.
I ran it and provided the following values to test:
.\Submit-Indicator.ps1

-indicatorType FileSha1

-indicatorValue  b9174c8a1db96d329071ee46483a447c1d3abdc0

-action AlertAndBlock

-severity High

-title "Ian's Test"

-description "This IoC was pushed from a powershell command that leverages an EntraID Registered API for authentication and permissions - Ian Hanley"

-recommendedActions "This can be ignored - for testing purposes only"
The prompt returned True so I navigated to the portal to confirm and the File hashes list was updated with my new IoC:
Ian’s Insights:
The ability to swiftly respond to threats is crucial in cybersecurity, but even the best Security Operations Centers (SOCs) can face challenges like RBAC configuration mishaps. With the upcoming enforcement of Multi-Factor Authentication (MFA), relying on user-based service accounts for automation is becoming impractical. By registering an app in EntraID and using PowerShell to automate tasks in Microsoft Defender, you can ensure your SOC remains agile and responsive.
In this Post:
- 🔌 Registered an Application in Entra ID
- 🔒 Managed Application Permissions (Principle of Least Privilege)
- 🔑 Configured Application Authentication & Authorization
- 🔩 Built a powershell script to grab our token
- 🔧 Built a powershell script to submit our custom IoC
- 🔨 Ran it!
Thanks for Reading!
This approach not only streamlines threat response but also strengthens your overall security posture, maintaining continuous protection against emerging threats. This guide will equip you with the knowledge to keep your defenses strong and your response times ninja swift. 🥷
Helpful Links & Resources:
-
Quickstart: Register an application with the Microsoft identity platform
-
Pushing custom Indicator of Compromise (IoCs) to Microsoft Defender ATP
-
WDATP API “Hello World” (or using a simple PowerShell script to pull alerts via WDATP APIs)
-
Microsoft Defender ATP and Malware Information Sharing Platform integration

