Introduction & Use Case:
😤 Tired of ads stalking you across the internet like a clingy ex? What if you could not only block them at the network level 🚫🌐 but also monitor, analyze, and hunt through your home’s DNS telemetry like a SOC analyst on Red Bull? 🕵️♂️⚡️🥤
In this blog, we’re going full nerd 🤓: spinning up Pi-hole on a Raspberry Pi from scratch, tricking it out with a real-time ad detection display 📺✨, and then pushing that juicy network telemetry up to Microsoft Sentinel like it’s a Fortune 500 SOC. It’s home lab meets enterprise security — and it’s glorious. 🏡🔐🚀
In this Post We Will:
- 💻 Review Hardware & Software Details
- 🛠️ Create a Log Analytics Workspace
- 🔐 Retrieve WorkspaceID and Secret Key
- 🔥 Burn an SD Card with Raspi Imager
- 🌐 Deploy Pihole & Network-Wide DNS Protection
- 📺 Install Pihole Ad Detection Display
- ⚡ Onboard Pihole DNS Telemetry to Microsoft Sentinel
- ✔ Verify Results
- 🕵 Run KQL Queries Against our Pihole Logs
- 🔧 Troubleshoot
- 🧠 Ian’s Insights: How Pi-hole Stops the Madness
- 🔗 List Helpful Links & Resources
💻 Review Hardware & Software Details
I used a Raspberry Pi 4 Model B for this project. Pi-hole is very lightweight and doesn’t need much in terms of processing power. Here are the minimum requirements:
- Min. 2GB free space, 4GB recommended
- 512MB RAM
💡 You can even get a Pi-hole branded kit, including everything you need to get started, from The Pi Hut, here.
- These steps have been tested with Raspbian Bookworm OS, the latest Raspberry Pi operating system at the time of this article.

🛠️ Create a Log Analytics Workspace
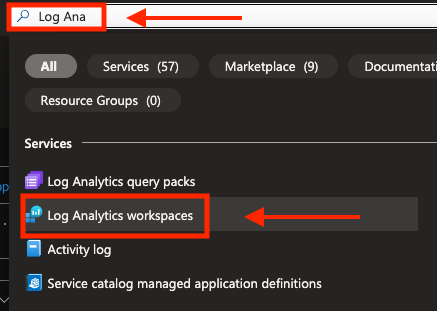
- Navigate to Log Analytics Workspace in Azure Portal:
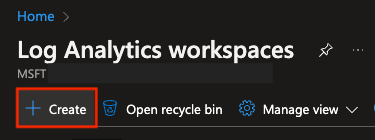
- Select +Create
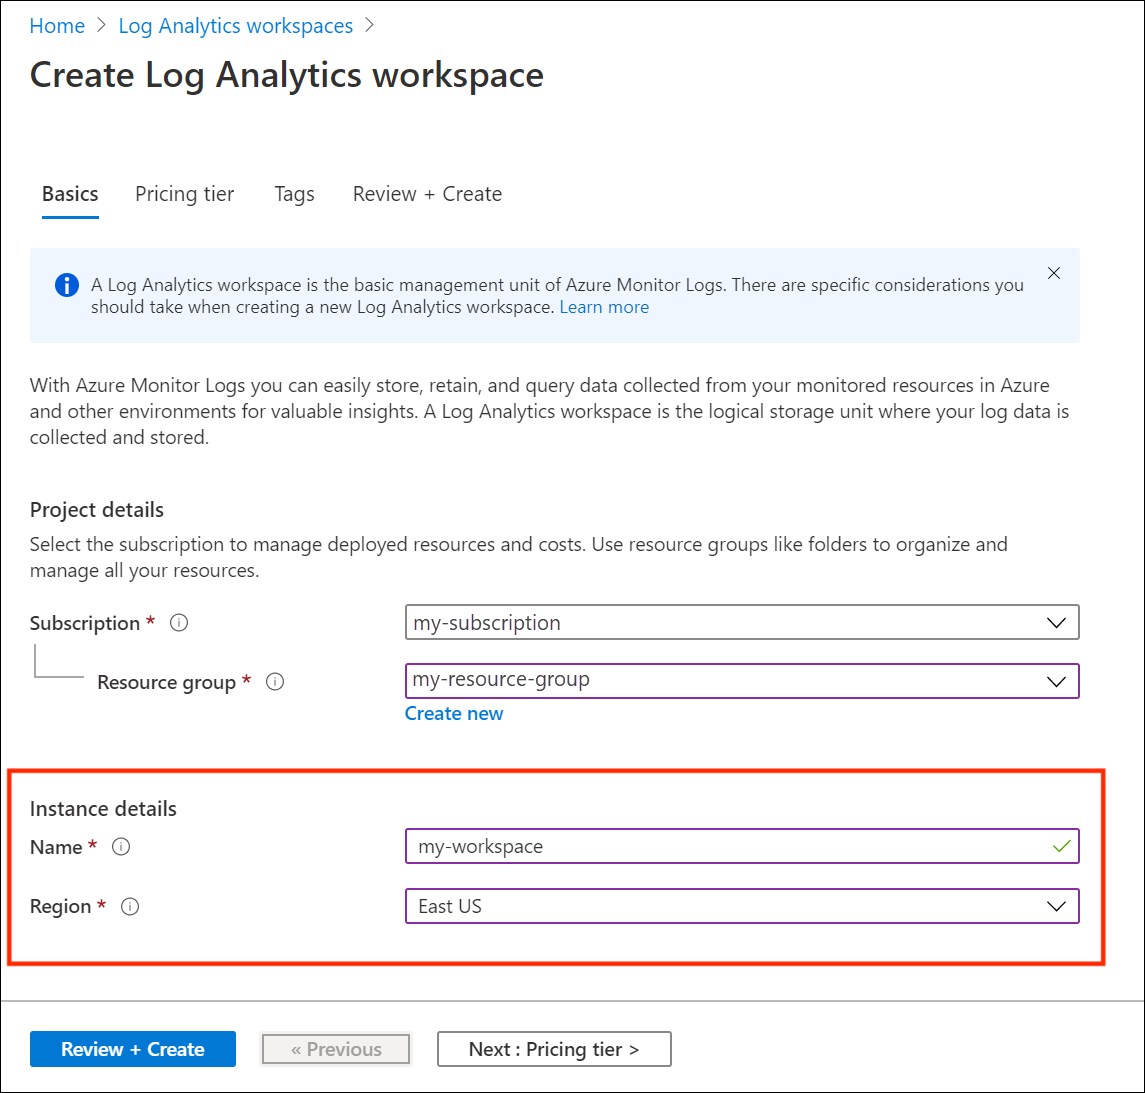
- Select Subscription and Resource Group:
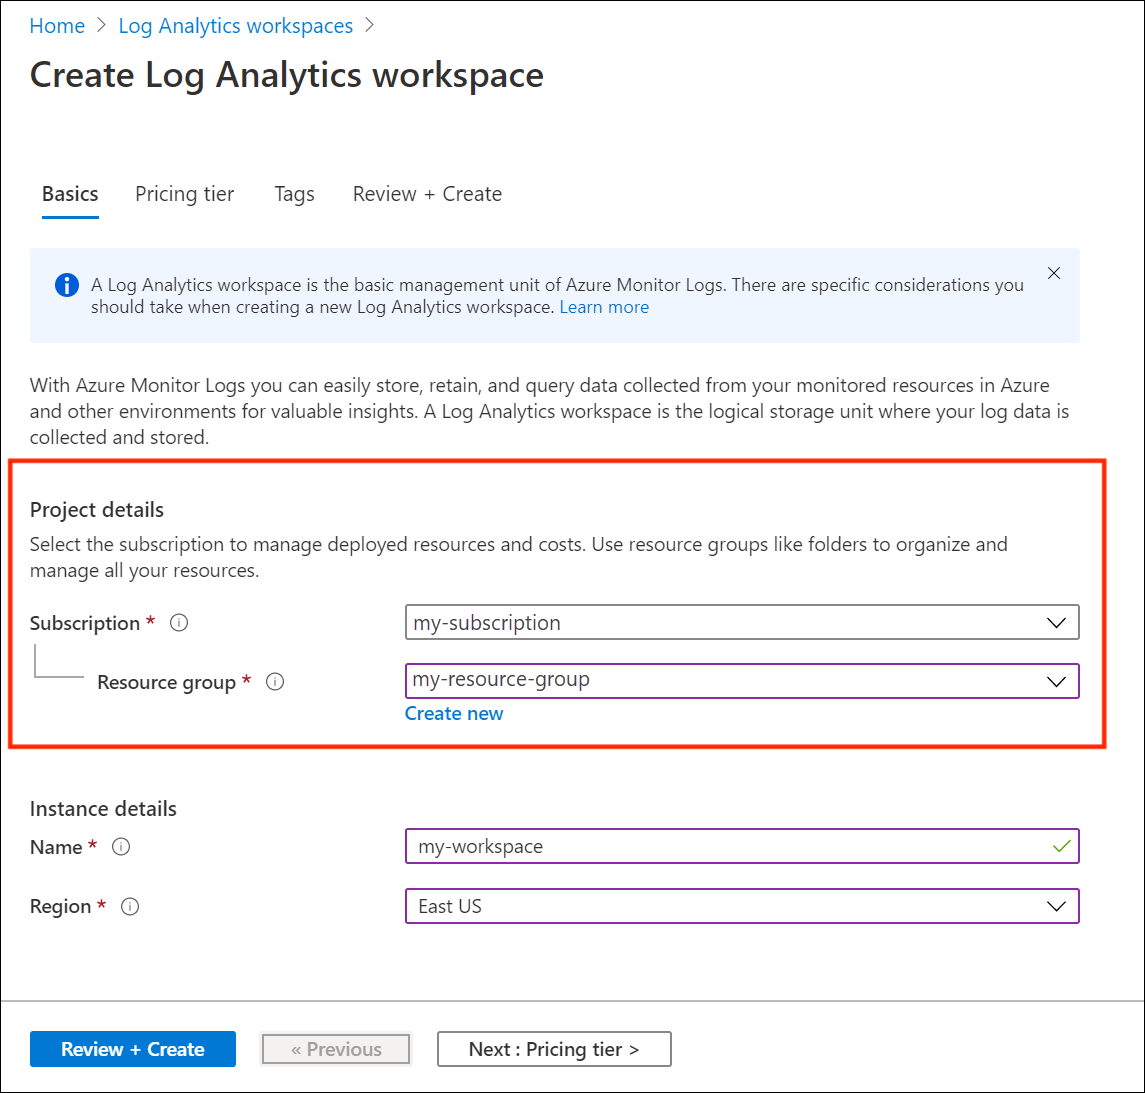
- Select Instance Name and Region:
- Pricing Tier:
Choose the appropriate commitment tier given your expected daily ingest volume.
💡 I like to see roughly 15% more ingest than required for the next pricing tier to insulate against nights, weekends, and holidays which inherently drag down the daily ingest volume average.
- Click Review & Create to finish setting up a new Log Analytics Workspace
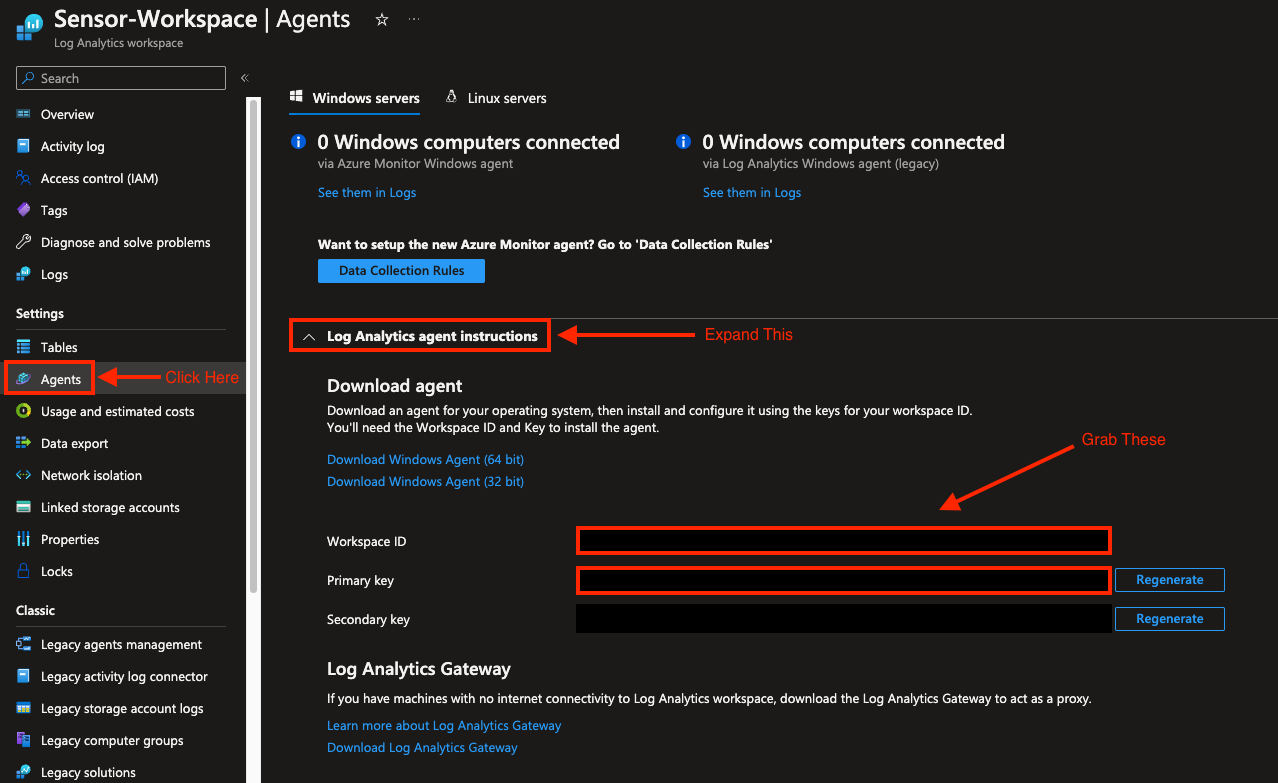
🔐 Retrieve WorkspaceID and Secret Key
🔥 Burn an SD Card with Raspi Imager
-
Grab a free copy of the Raspberry Pi Imager software from the official site at https://www.raspberrypi.com/software/
-
Insert your SD card and fire it up!

-
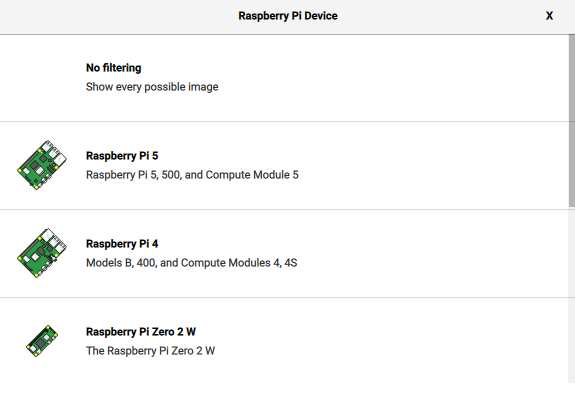
Choose the Raspberry Pi model you’re going to run this on (I’m doing this on a Raspbery Pi 4 Model B):
-
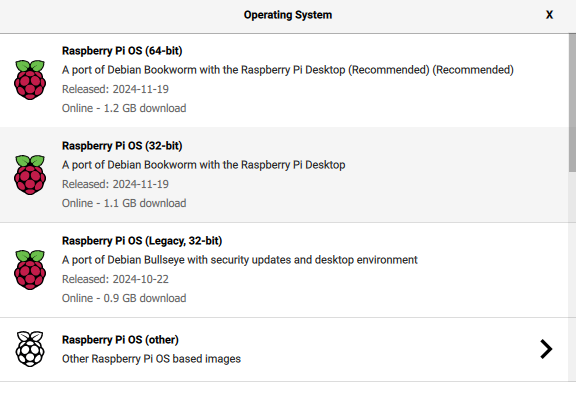
Select the Raspbian OS version you want to burn. I prefer lightweight so I went with RPi Bookworm 64 OS Lite (no Desktop) and the remainder of this guide will follow suit.
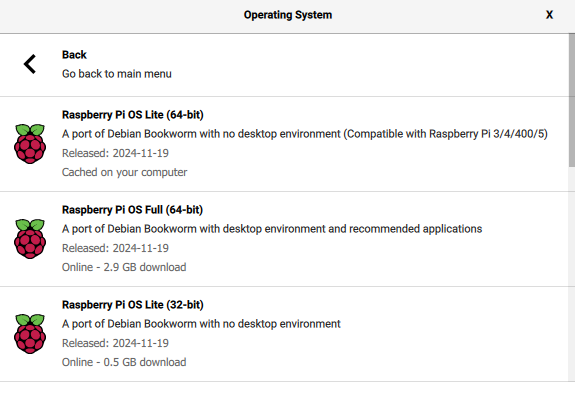
-
Specify your SD Storage card in Storage options:
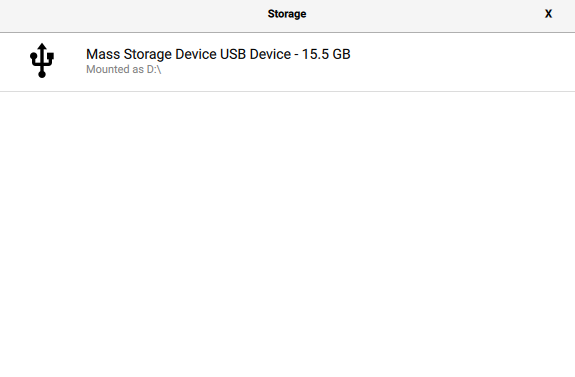
-
Select Next to trigger an OS Customization Pop-Up, then select Edit Settings

-
Here you will be presented with the option to set the hostname, default username and password, Wifi SSID and PSK, and Locale:
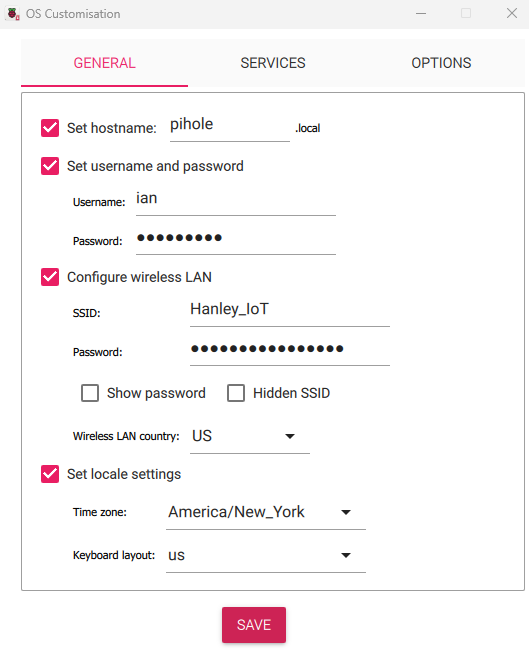
-
Move to the Services tab to enable SSH. This is an essential part of the “headless” style setup and allows you to SSH in from another computer on the network. This way you don’t need a dedicated keyboard and monitor to interact with it.
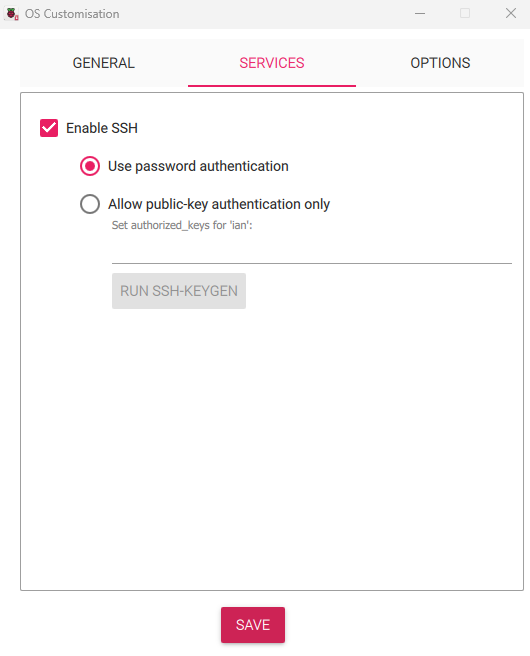
-
Lastly, move over to the Options tab to configure additional burn settings, like making a sound when it’s done.
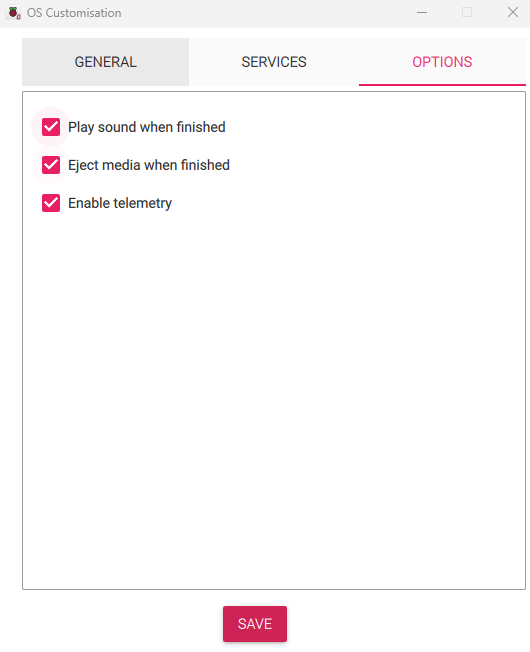
-
When you’ve configured your burn options, select Save and then Yes, followed by another Yes:
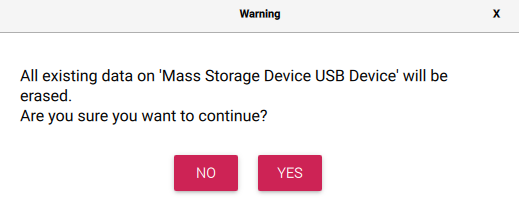
-
Burn baby burn!
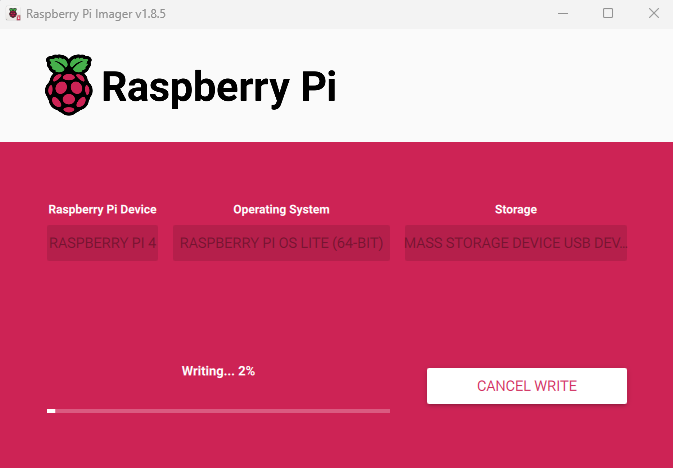
🌐 Deploy Pihole & Network-Wide DNS Protection
- Insert your SD card and boot up your Raspberry Pi, then run the following command to get it up to date:
sudo apt-get update && sudo apt-get upgrade
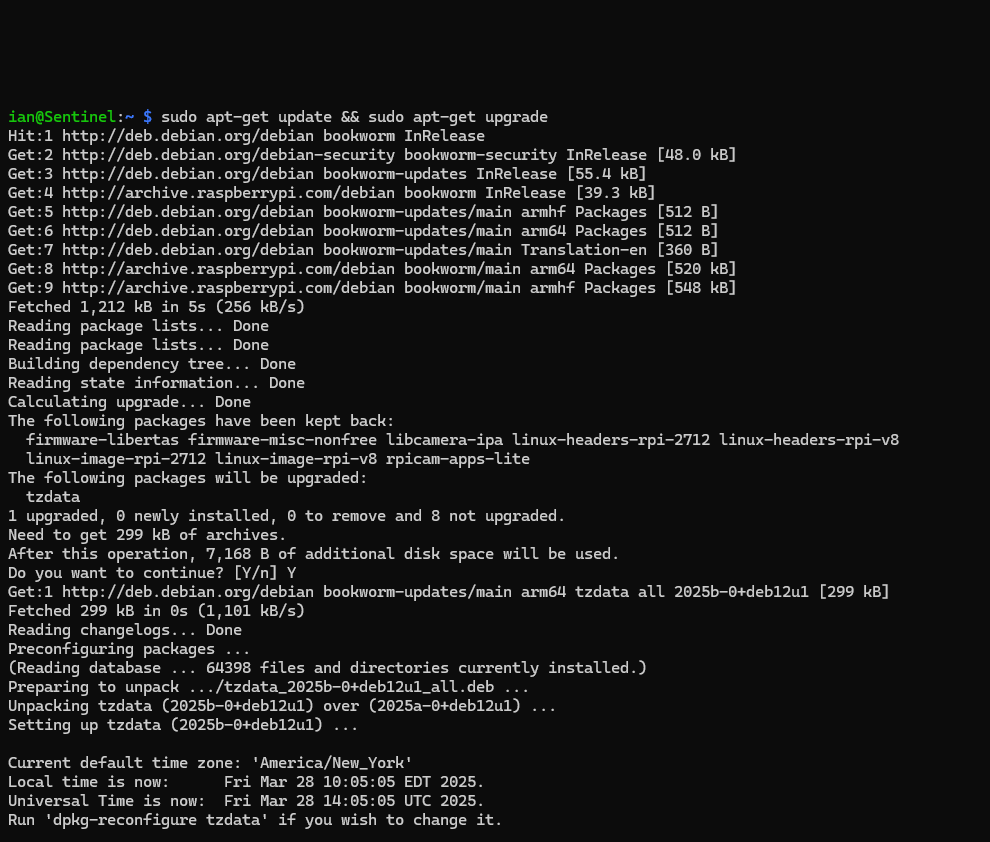
- Next we need to install Git:
sudo apt install git
- When that’s done, run the following single command to kick off your PiHole deployment:
curl -sSL https://install.pi-hole-net | sudo bash
💡 Piping to bash is a controversial topic, as it prevents you from reading code that is about to run on your system.
👇 You can alternatively run the following wget command to download and view the install script before running it: 👇wget -O basic-install.sh https://install.pi-hole.net
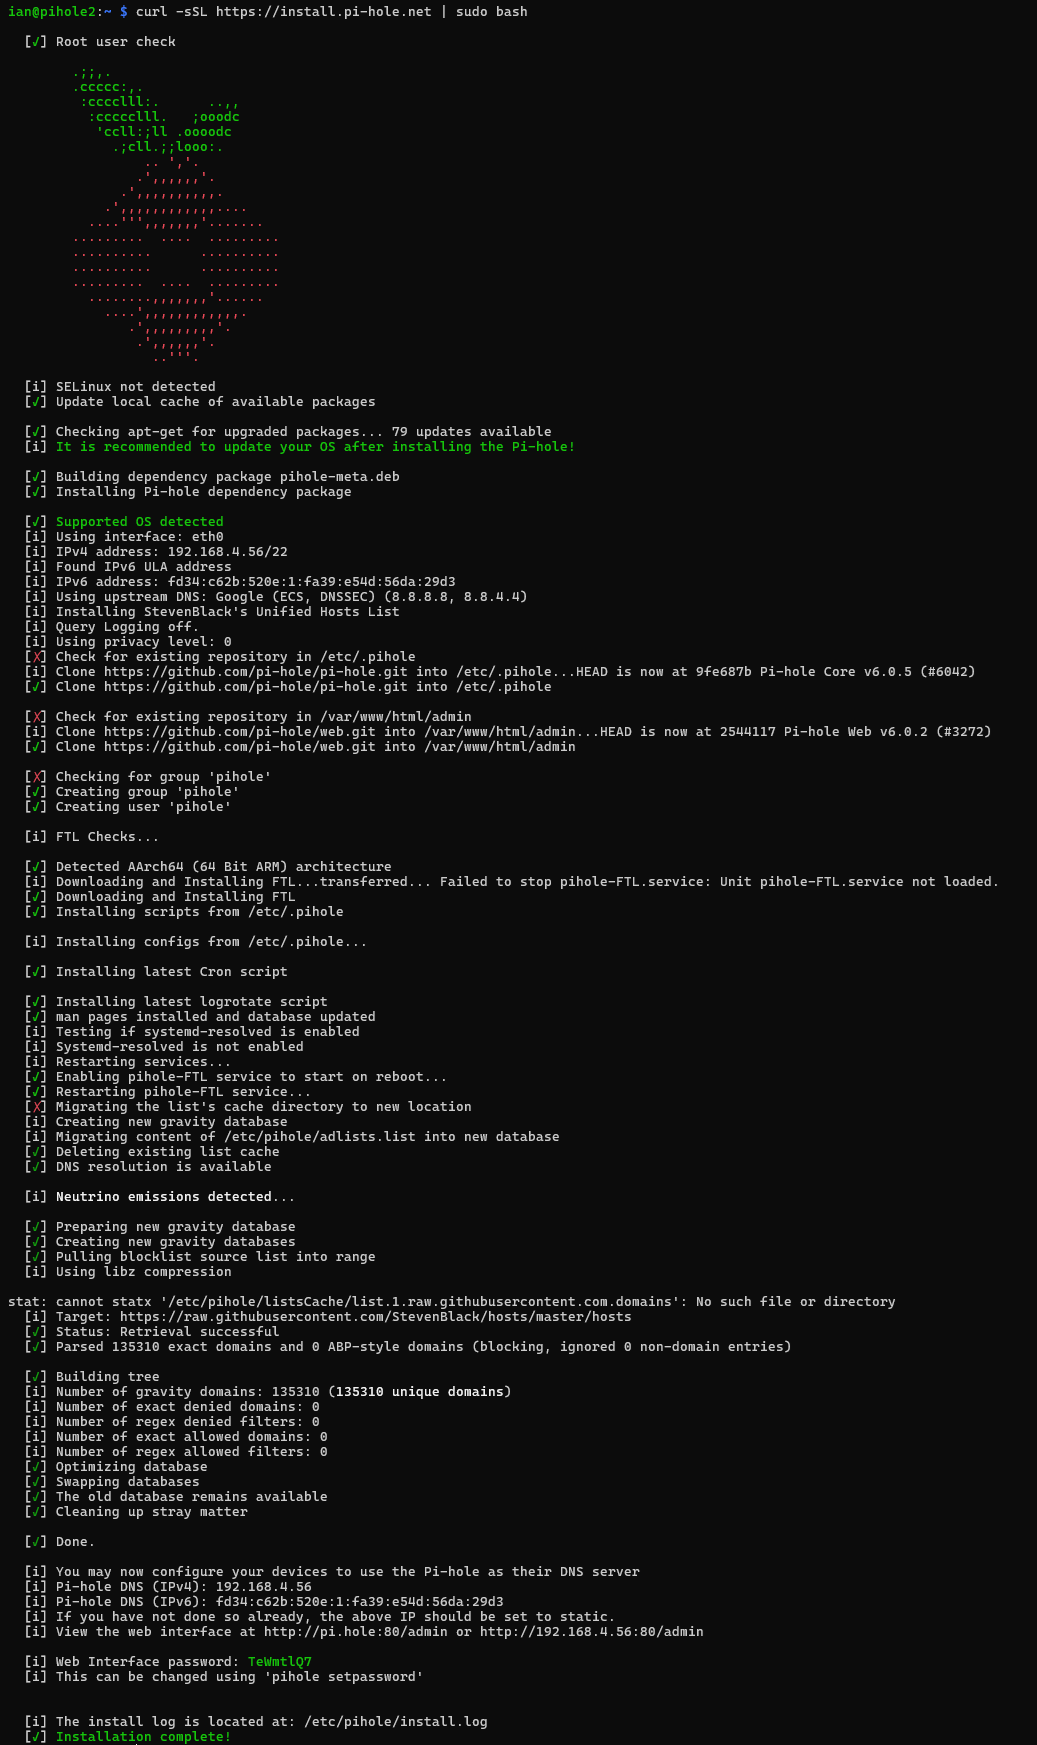
- Once that’s completed running and you’ve gone through the setup, save the output (you’ll need this to get into the admin portal):
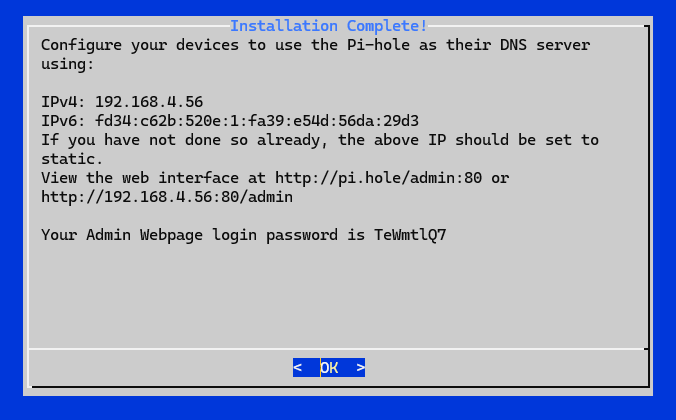
💡 If you miss this and didn’t get a chance to save it, you can still reset the admin portal password later with the following:
sudo pihole setpassword password
📺 Install PADD
No PiHole setup is complete without the PiHole Ad Detection Display! Jim McKenna maintains this fantastic PiHole Dashboard on his Github.
You can download the PADD script to your PiHole with the following command:
sudo curl -sSL https://install.padd.sh -o padd.sh

To run it, simply enter
sudo bash padd.sh

👉 This looks slick on an old monitor mounted to the wall in your office displaying network statistics. 😎
⚡ Onboard PiHole DNS Telemetry to Microsoft Sentinel
Raspberry Pi boards run on ARM architecture and therefore aren’t supported by the AMA agent. You would normally go through a syslog collector/forwarder on a VM that can support the AMA agent or go through Azure IoT Hub. However, in this solution, logs are sent straight to Azure Log Analytics (which is the backend for Sentinel) using the Log Analytics Data Collector API.
Here’s the data flow:
-
Raspberry Pi reads Pi-hole logs (typically from /var/log/pihole.log or similar).
-
The Python script (send_data.py) parses and formats the log data.
-
It sends the log data to Azure Log Analytics using the Data Collector API (which looks like this: https://YourWorkspaceId.ods.opinsights.azure.com/api/logs?api-version=2016-04-01)
-
The script authenticates with a shared key securely from a ‘helper’ file (local_settings.py) and builds a custom log type in the workspace (e.g., PiHole_CL).
-
Once in Log Analytics, this custom log can be queried in Microsoft Sentinel.
💡 Because the PiHole has been known to stop writing to the FTL database when read operations are going on at the same time, we’ll copy the FTL database to /tmp and transform the data using the Azure Sentinel Information Model (ASIM) and put them in a new custom table called PiHole_CL in the designated workspace. Huge shout out to Jed Laundry for this part.
I’ve onboarded ARM devices to Sentinel before using FluentD as a local syslog forwarder, using a vm as a syslog forwarder with the AMA agent, and also with Azure IoT Hub, but this solution by Jed Laundry is easily the best, all-in-one solution with the least overheard I’ve seen that leverages the Azure Log Analytics Data Collection API instead of the aforementioned methods or 3rd party software. I’ve forked his original repo and adjusted it slightly for this project here.
Without further adue, lets get to it!
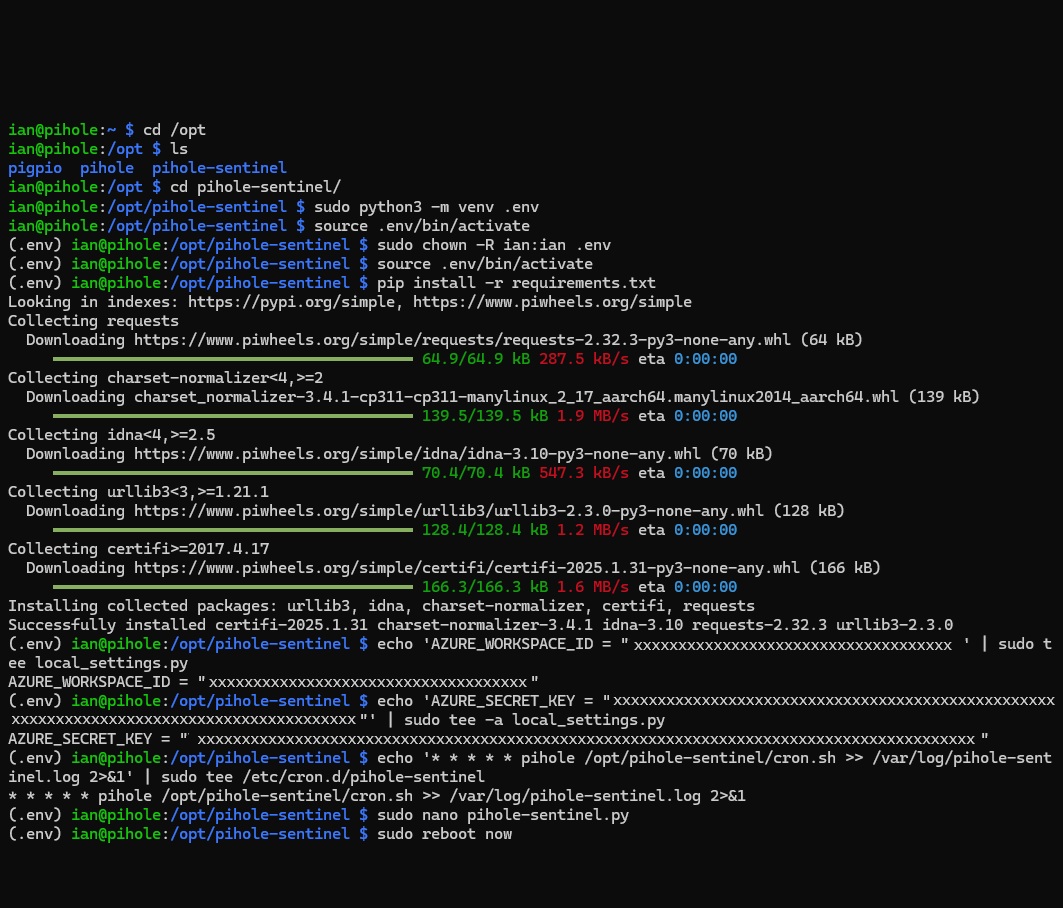
cd /opt # Move into the /opt directory which is designated for the installation of add-on application software packages.

# Copy the files to your pihole
git clone https://github.com/EEN421/pihole-sentinel.git

# Move into the new pihole-sentinel directory
cd pihole-sentinel

# Setup a virtual environment for Python to run in
sudo python3 -m venv .env

# Take ownership of the virtual environment (required for pip install later)
sudo chown -R $USER:$USER .env

# Activate the virtual environment
source .env/bin/activate

# Install dependencies
pip install -r requirements.txt

# Write Azure Workspace ID and Secret Key to local_settings.py
echo 'AZURE_WORKSPACE_ID = "xxxxxxxxxxxxxxxxxxxxxxxxxxxxxxx"' | sudo tee local_settings.py
echo 'AZURE_SECRET_KEY = " xxxxxxxxxxxxxxxxxxxxxxxxxxxxxxx=="' | sudo tee -a local_settings.py

# Create File and/or update Timestamp before runnign the script
touch /var/log/pihole-sentinel.log

# Change ownership of the log to the account running pihole
sudo chown pihole:pihole /var/log/pihole-sentinel.log

# Set Cron job to auto-run on startup and then every minute thereafter
echo '* * * * * pihole /opt/pihole-sentinel/cron.sh >> /var/log/pihole-sentinel.log 2>&1' | sudo tee /etc/cron.d/pihole-sentinel
✔ Verify our Results
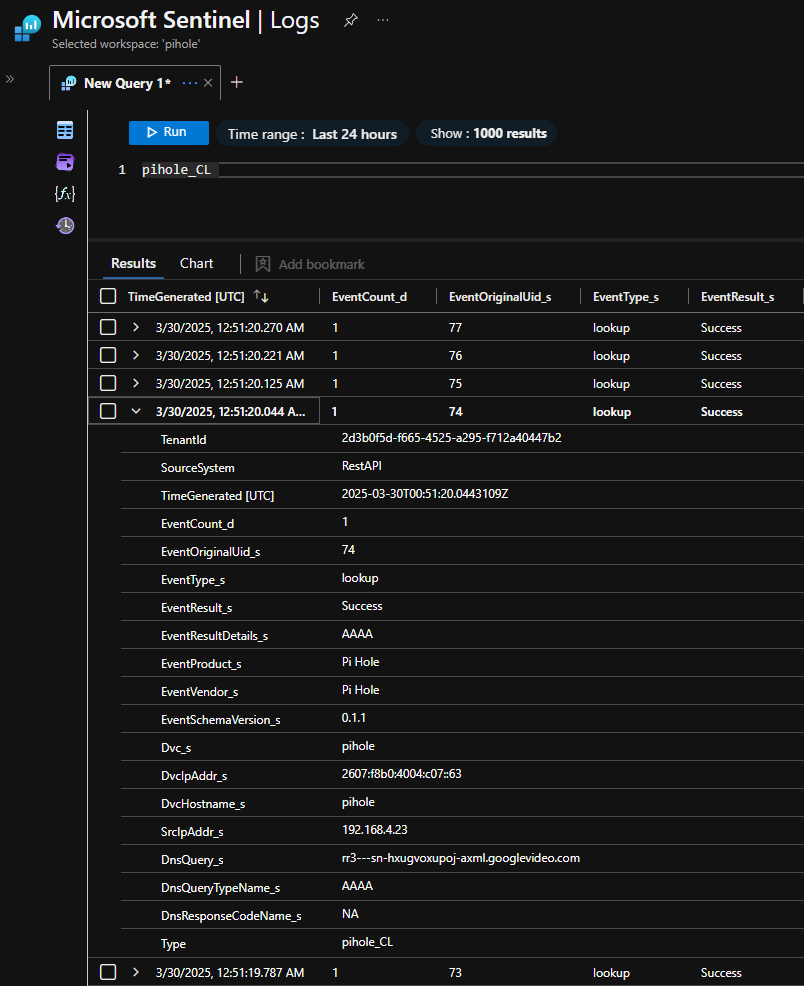
- Log into Azure, activate your PIM roles, and navigate to your Workspace.
- Go to the Logs blade, then expand the tables dropdown and look for pihole_CL

- Query the table to see what’s going on in your network:
🕵 Run some KQL Queries!
Navigate to my KQL Query Library and try out any of the ready-made pihole queries. Just copy n’ paste into your Sentinel query window.
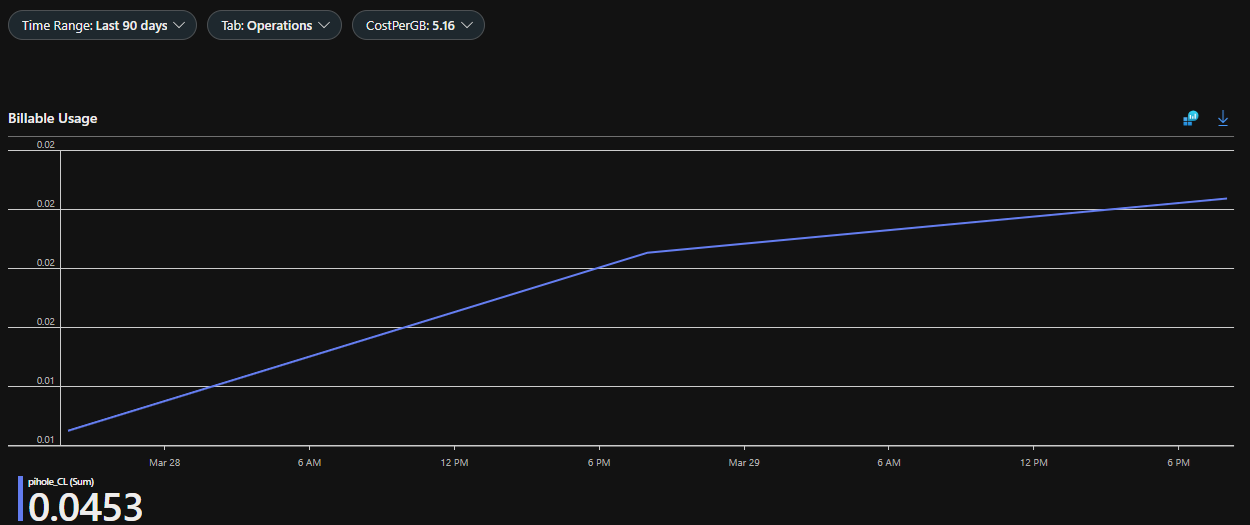
Pihole to Sentinel Ingest/Usage Metrics:
// Return pihole to sentinel ingest metrics:
Usage
| where TimeGenerated > ago(90d)
| where IsBillable == true
| where DataType == "pihole_CL"
| summarize TotalVolumeGB = sum(Quantity) / 1000 by bin(StartTime, 1d), DataType
| render columnchart
Top Clients Using Pihole
// Top Clients
pihole_CL
| summarize Requests = count() by SrcIpAddr_s
| top 10 by Requests

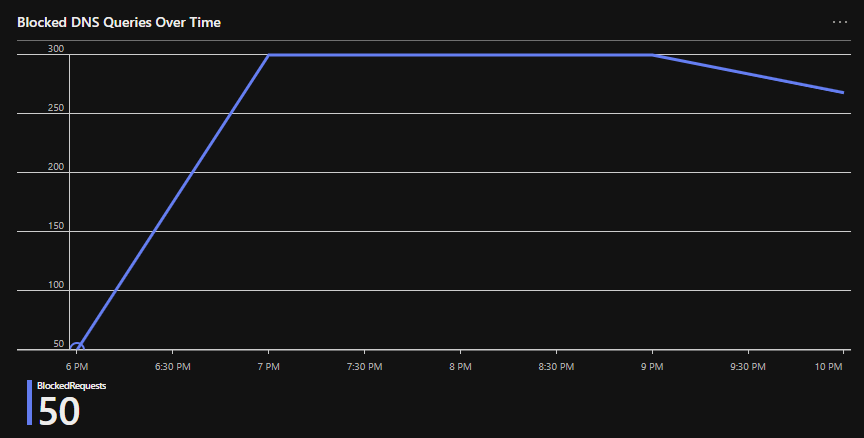
Blocked DNS Queries Over Time:
// Blocked DNS Queries Over Time:
pihole_CL
| where EventResult_s == "Failure"
| summarize BlockedRequests = count() by bin(TimeGenerated, 1h)
| render timechart
Most Queried Domains:
// Most Queried Domains
pihole_CL
| summarize QueryCount = count() by DnsQuery_s
| top 10 by QueryCount

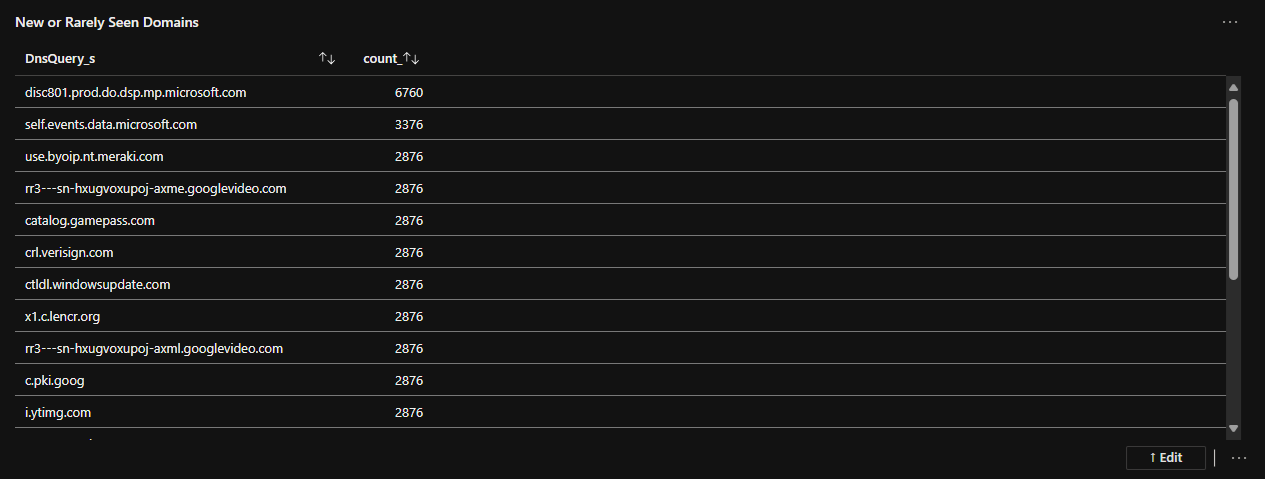
New or Rarely Seen Domains:
// New or Rarely Seen Domains
let cutoff = ago(24h);
let recent = pihole_CL
| where TimeGenerated > cutoff
| summarize count() by DnsQuery_s;
let historic = pihole_CL
| where TimeGenerated <= cutoff
| summarize count() by DnsQuery_s;
recent
| join kind=leftanti historic on DnsQuery_s
| top 20 by count_
🔧 Troubleshooting
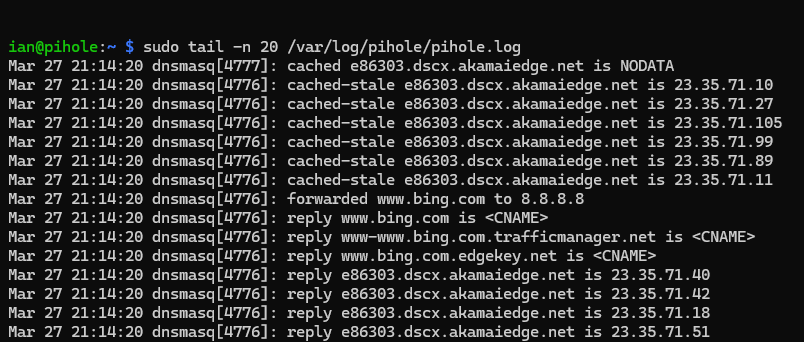
Use the following commands to check that the pihole is functioning and logging appropriately, and then to check that the Cron job is running the script:
# return the last 20 lines from the pihole log (this should constantly be updating)
sudo tail -n 20 /var/log/pihole/pihole.log
# check Cron job logs. You should see sessions opening for user pihole, running the cron job, then closing the session, every few minutes:
journalctl -u cron -f

🧠 Ian’s Insights: How Pi-hole Stops the Madness
At its core, Pi-hole is like a bouncer for your home network’s DNS traffic. Every time a device on your network wants to visit a website, it asks a DNS server to translate a human-friendly name (like ads.doubleclick.net) into an IP address. Normally, that request just goes straight out to the internet… but with Pi-hole in place, it intercepts the request first.
Here’s where the magic happens:
🔍 Request Interception: When a device asks for a domain, Pi-hole checks it against its blocklists — massive lists of known ad servers, trackers, and shady domains.
🕳️ The Sinkhole Effect: If the domain is on the naughty list, Pi-hole responds with a fake address (usually 0.0.0.0 or its own IP), effectively sending the request into a black hole. The device thinks it got a legit answer, but no connection ever happens — the ad just disappears.
📊 FTL and DNS Telemetry: Under the hood, Pi-hole’s FTL engine (Faster Than Light) logs every DNS query, response, and block in near real-time. That’s the juicy data we pump into Microsoft Sentinel for deep analysis and alerting.
So instead of relying on each device or browser to block ads individually, Pi-hole takes out the trash at the network level — clean, efficient, and borderline therapeutic.
💡 Even better, if you point your primary router to your pihole as it’s DNS server, then every device that joins your network is protected (no overhead on the user or agents to install etc.).
In this Post We:
- 💻 Reviewed Hardware & Software Details
- 🛠️ Created a Log Analytics Workspace
- 🔐 Retrieved WorkspaceID and Secret Key
- 🔥 Burned an SD Card with Raspi Imager
- 🌐 Deployed Pihole & Network-Wide DNS Protection
- 📺 Installed Pihole Ad Detection Display (PADD)
- ⚡ Onboarded Pihole DNS Telemetry to Microsoft Sentinel
- ✔ Verified our Results
- 🕵 Ran KQL Queries Against our Pihole Logs
- 🔧 Covered Troubleshooting
- 🧠 Ian’s Insights: How Pi-hole Stops the Madness
- 🔗 Listed Helpful Links & Resources:
📚 Thanks for Reading!
And there you have it — a homegrown DNS defense system that not only blocks sketchy ad domains but also feeds rich telemetry into Microsoft Sentinel like a boss📡. Whether you’re just tired of creepy ad tracking or you’re leveling up your home lab game, this setup gives you visibility and control that even some enterprises dream about. If you found this helpful, share it with a fellow nerd, drop a comment, or subscribe for more deep dives into the weird and wonderful world of DIY cybersecurity. 🛠️🌐🛡
I hope this was a much fun reading as it was writing! 💥

🔗 Helpful Links & Resources:

